NM: Week 11 Video


How did you author (the photo or video) you recorded for upload to Instagram?

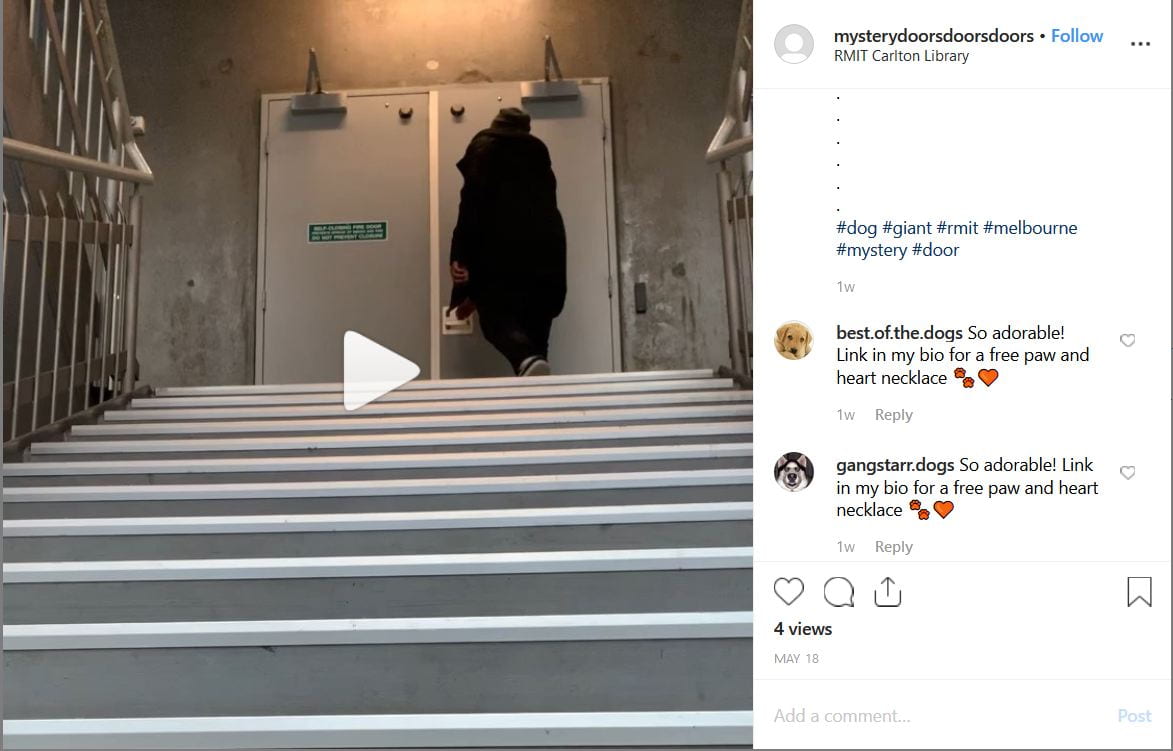
For the last video, I continue with the same theme. I am happy with the way the grid has turned out and will be trying something similar with my own Instagram account.
This video was recorded using the rear face camera of an iPhone XR. I used my friend as an actress for this video. The video was also edited using an app called Video Leap. I have become more familiar with the features of Video Leap but I will never use it personally as after effects are much better. I used Video Leap to edit the brightness, contrast and add a filter. I masked a black square and add a purple filter for vfx this time.
I haven’t discovered any new differences that I have previously discussed over my blogs.

How did you publish (the photo or video) you recorded for upload to Instagram?

I had to do the same as the video and record many different videos as the lighting was poor. I selected the video with the best lighting.
The duration of time between the video and photo was five minutes this time as I want to test the audience reaction if it changes at all. If I have a more engaging audience this would also make it is as I have taken into account.
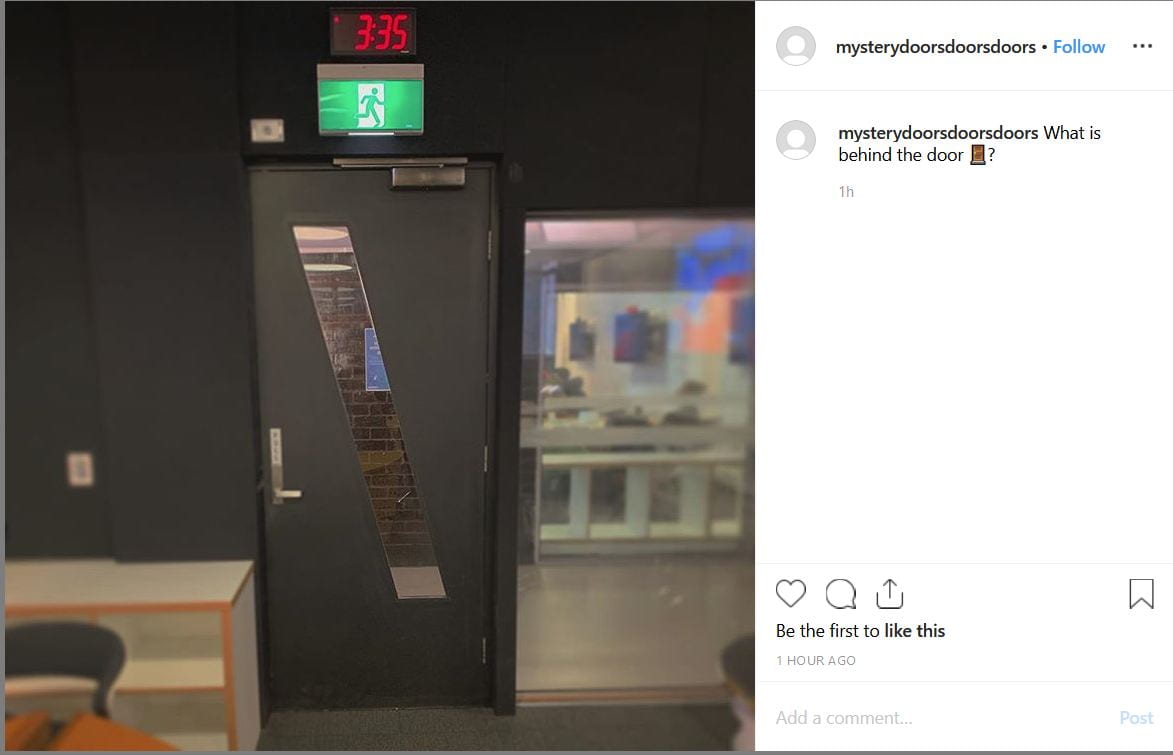
For the caption, I have kept them short and have also not put hashtags to see how much engagement. I have already gotten 2 views an hour that good for this account.

How did you distribute (the photo or video) you published on Instagram to other social media services?

I discover I need to do a lot more research into Tumblr as my post did not do very well. I did do my last post but I am not expecting much. It might also just be that the images are pictures and videos of ugly doors.
I posted the last one on Twitter as it did well on Twitter. I have never used twitter before it was an interesting app and will be using it in the future.

NM: Week 11 Photo

How did you author (the photo or video) you recorded for upload to Instagram?

In this weeks photo blog, I want to use Instagram with a professional but with software outside of Instagram. I have to edit the photo this week the highest rating phone app I could find.
This was captured using the rear face camera of an iPhone XR. The image was edited in an app called Pic Art that I found on the app store. In Pic Art I applied a filter, edit the contract, the hue and added a blur. I did change the square when uploading it to Instagram.
I found no difference using Pic Art and using Instagram to edit. I found that Pic Art had more features for editing peoples faces and as I took a photo of a door it did not really help the editing much.

How did you publish (the photo or video) you recorded for upload to Instagram?

I took a few different photos and chose from the one with the best lighting as the lighting in this room was very poor for some reason.
When publishing I want to try out how much engagement I would get if I published with no hashtags. As I have never tried this out the personal account and have always wonder how much engagement I would get.

How did you distribute (the photo or video) you published on Instagram to other social media services?

There was no difference in how much engagement I get on Tumblr I just starting to think that doors are not that popular on Tumblr. I have discover if I link my Tumblr to my Instagram when I post I can post the same thing instantly make distributing faster process.

As for twitter, it is going well with the way I am using it so I’m going to try on my personal facebook. On my facebook, I wrote that this is my assignment about mystery doors. My friends did like it but also comment that taking pictures of doors was stupid.

NM: Week 10 Video

How did you author (the photo or video) you recorded for upload to Instagram?

The video for this week is also a revile as it will be all three weeks. This will not all be done in the Instagram app as it is not possible to mask on Instagram.

This video was recorded using the rear face camera of an iPhone XR. The video was also edited using an app called Video Leap. This week I learned more about Video Leap so I could do more editing. In Video Leap Coram key out the background of my stock video, changed the brightness, added a filter and edited the contact.

The difference is still just the editing process. I find that recording is the same a digital camera just the quality isn’t as high.

How did you publish (the photo or video) you recorded for upload to Instagram?

I selected the best video from a range of different recordings. I chose the one with the best angle mainly because I used my drink bottle as a tripod as I was at uni with no tripod.

The caption this week was the same as the week 9 photo as that way got me the most engagement and I want to try it out again to see if it was the image, the way I hashtagged or the hashtags I use that got me that much engagement.

How did you distribute (the photo or video) you published on Instagram to other social media services?

This week video on Tumblr was the same as the last two blogs. I just decided to customize my page on Tumblr to make it more appalling to try and get more people to come and visit it as it is not getting a lot of engagement.

Twitter is doing well so I have decided to keep writing long captions and having a lot of hashtags. I mainly think it is doing well because I use a lot of hashtags.

NM: Week 10 Photo

How did you author (the photo or video) you recorded for upload to Instagram?
For this week I am still keeping the same theme of mystery doors so that my grid 6-3 can all be related. I will be authoring as a professional but only in the Instagram app. So the limitation of Instagram will effect this image.

This was captured using the rear face camera of an iPhone XR in the Instagram app. This photo has the Instagram aspect ratio as the Image was taken with the Instagram app. The photo was trimmed and edited on Instagram with no outside software. In the editing, I did alter the brightness, contrast, hue and added a blur. I want to take multiple shots but the limitation of Instagram did not allow me to.
The difference I found with authoring with only Instagram was that the camera in the app was not that great. As you could not take multiple shots using the Instagram camera. As taking a photo in a square was very strange as this is the first time I have done it this way.

How did you publish (the photo or video) you recorded for upload to Instagram?
I only had to snap and go and hope for the best when using the Instagram app. It would have been more helpful if I had taken the images outside of the Instagram app and there would have been more images to choose from.

The caption this time I tried another method of publishing to get more engagement. I find this way is kind of like cheating. The way I did it was to post the caption than in the comment to post all of my hashtags. This gives you more engagement as you have an extra comment.

How did you distribute (the photo or video) you published on Instagram to other social media services?

I decided to use the Tumblr account for all three weeks to keep it constant. I thought that it would be good practice to keep it consistent as if I worked an in digital marketing would have to do it this way. I post the same caption and hashtags as I did last week.

For the other platform Twitter, I also continue to post on a regular weekly bases. The caption is also longer as I have previously explained why

NM: Week 9 Video

How did you author (the photo or video) you recorded for upload to Instagram?
I want to keep the theme of mystery doors that I talked about in my photo blog from this week. On each week video will be relieved of what is behind the door. The videos will all be amateur as I am not very good with video.

This video was recorded using a rear-facing camera of an iPhone XR and a tripod. The video was also edited using an app called Video Leap it’s similar to an open source version of after effects. In Video Leap I only masked out a video and replaced the other side of the door. I had to do multiple recordings as it was hard to find the right recording to edit. The video of the portal I used was just free stock I sound online.

The main difference I found was it is really hard to mask a video without a mouse on a touchscreen feature on a phone. Also, the video quality isn’t as high when recording on a phone. The software is also better on my computer.

How did you publish (the photo or video) you recorded for upload to Instagram?

I record multiple videos to get the right video to record as the software I use was not easy to edit with. I pick the right video with the right angle and the best lighting that how I selected the video to chose.
When publishing I want to space out the time that the photo and video are posted to see what length of time get the best engagement. As the video and photo and both connected in theme.

For the captions wanted to try different ways of hashtagging or the next few posts to test which one gets the most engagement. This time I hashtagged in the caption in this format ‘#wow #mystery revealed #secret #portal behind #door’. This is the first time I have posted in this way I want to use this project to test different ways to use hashtags when publishing on Instagram.

How did you distribute (the photo or video) you published on Instagram to other social media services?

From Instagram, I shared this on the same Tumblr account I used for the photo. For the caption, it was the same but the hashtags where part as you can’t write captions like that on Tumblr.

For the second platform, I used it was Twitter once again. I want to write more in all my twitter post as I think it is more important what you write in twitter than the video I post. The caption I wrote was’ big relieve found a portal from Melbourne to New York in the back of my house. What will be next week’s mystery door.’

NM: Week 9 Photo


How did you author (the photo or video) you recorded for upload to Instagram?
For the authoring, all 3 weeks on photo and videos will have a theme of revealing what is behind the mystery door. I wanted to capture 3 different types of users on Instagram an amateur, a professional inside Instagram and a professional with a camera phone over the next few weeks. This photo was authored to have the aesthetics of an amateur Instagram user.

I used the rear facing camera of an iPhone XR. To gain this aesthetic there was no planning done, I did not use the Instagram aspect ratio, I did not use any filters, had poor lighting, did not edit the photo. I had only taken one shot instead of taking multiple and choosing from them to make it look as poor quality as possible.

The difference from my authoring if I was to take an amateur shot from a camera is that I would not have to worry about the aspect ratio of Instagram.

How did you publish (the photo or video) you recorded for upload to Instagram?
Only one image was taken as I wanted it to have the aesthetics of an amateur and I wanted the quality to look super poor. Usually, when I upload to Instagram take a few images a curate through them.

The geolocation was added in the photo to add to the theme of mystery doors. I kind of want people to look for the door and see what is behind it.
For my caption, I decided to ask a question to try and encourage engagement. The caption was ‘ What is behind the mystery door?’ I used hashtags in the caption and dotted out the rest of the hashtags. The hashtags I used were #stainglasswindow, #door, #mysterydoor, #door and #what. I struggled to think of many hashtags that relate to doors.

How did you distribute (the photo or video) you published on Instagram to other social media services?
I also distributed this photo on Tumblr on a new account that I made for this research blog. I posted the same image with the same caption and hashtags. I found that I should not make the caption longer or the photo any different as Tumblr and Instagram are both visual-based platforms.

The second social media I used was twitter account I also made originally for this project. The post was a lot different this time as Twitter is more of text-based platform. The caption I use was longer it was ‘ Found this series of mystery doors around #melbourne come along for the journey. This is the mystery door one wonder what is behind it.

Week 8 – Networked Video (practice analysis)

Who is the practitioner (what is their name?) and when were they practicing?
The practitioner of this networked video is Abe Kislevitz. Abe is an American Instagram photographer who works for GoPro. Abe takes photo and video of extreme winter sport using different types of GoPro. The GoPro he most commonly uses are the hero7 and the fusion.

What is the title of the photo or video you have chosen to analyse (can you provide a link?)
The title of the video that I have chosen is Backies for dayz !

With the photo or video, you are examining when was it produced (date)?
This video was produced March 2019 for Oakley week at Mammoth Mountain, California, USA

How was the photo or video authored?
This video was authored using a GoPro fusion. The GoPro fusion is the first true 360 action camera as it has two ultra-wide lenses. The size and technology in the fusion make it ideal for capturing extreme sport. Abe also had to ride the snowboard as GoPro photography requires the photographer to be the subject or to follow the subject in extreme situation.

He then would have used some sort of video editing software to edit the video before he posted in on Instagram. As the video looks professionally edited

How was the photo or video published?
The video backies for days was published on 20th of March 2019 on Abe Kislevitz Instagram account (@abekislevitz). It wasn’t published on his YouTube, Facebook or personal website. This could have possibly been shared on another person story or on his own Instagram story. As his post are usually shared on his story

All of his posts are sponsored by GoPro so this was published on behalf of GoPro

How was the photo or video distributed?
As this was only been disturbed on Instagram I can only see that 27,616 people. He has a 2-4 month break between his YouTube videos so maybe this video will be Disturbed on Youtube at a later time in a compilation. Abe’s average engagement for the post are pretty low at 2.58%, it is still 2k+ people as he has 111k followers.

References: 

Abe Kislevitz 2019, About, Abe Kislevtiz, viewed 1 May 2019 <http://abekislevitz.com/about/>.

Abe Kislevitz, 2019, backies for dayz!,acessed May 2019 <https://www.instagram.com/abekislevitz>.


Week 7 – Networked Photography (practice analysis)

Who is the practitioner (what is their name?) and when were they practicing?
Akihito Nagata is a Japanese Instagram photographer who specializes in black and white.Themain subject matter of his photos is architecture and people. Akihito uses the username abu888 and has over 60k followers on Instagram.

What is the title of the photo or video you have chosen to analyse (can you provide a link?)
The photo I chose has the title ◇ (Osaka).


With the photo or video you are examining when was it produced (date)?
This photo was produced in April 2019. It was taken at the cross hotel in Osaka, Japan. It features model Chisato who is often featured in abu888 photos.

How was the photo or video authored?
This photo was taken using an iPhone X. Akihito has always used the iPhone to take all of his photos. He also uses a custom lens made in Japan called Tokyo Grapher. Akihito uses the wide lens for this photo. The Tokyo Grapher comes to a wide, tele, PL, macro and fisheye lens.

How was the photo or video published?
This was published on Akihito Instagram page abu888. He used hashtags and also tagged the model and the place of the photo.

How was the photo or video distributed?
This photo was distributed on Instagram, pictame, picgra, pick bait and other websites that are connected to Instagram. The photo has currently reached 1.8k likes. The abu888 account has a 2.25% engagement rate which is average for some with so many followers and he averages 1.4k likes so this post was above average for Akihito.

References: 

Akihito Nagata, 2019,◇ (Osaka), photograph, accessed April 2019, <https://www.instagram.com/abu888/>.

Week 6 – Analogue Video (practice analysis)

Who is the practitioner (what is their name?) and when were they practising?
Nam June Paik was a Korean American Video Artist, he was born in Seoul in 1932. Paik studied art at in the University of Tokyo. Paik practised video art from 1959 until his death in 2006. NJP is known as the ‘father of video art as he is a pioneer of video art. He is famous for creating the flux movement in video art.

What is the title of the photo or video you have chosen to analyse (can you provide a link?)
The title of what I have chosen is Nam June Paik Electronic Superhighway.

With the photo or video you are examining when was it produced (date)?
The original footage that was displayed in the Electronic Superhighway was made in 1960-90. NJP put all the footage together in this video art in 1995 and it was first displayed in Smithsonian American Art Museum in 1995.

How was the photo or video authored?
This artwork is authored by using 51 used footage videos of American pop culture mainly from 1960. The used footage is played on 51 DVD on to 336 TVs that are placed on a steel and wood structure. The TV is separated by 575 of neon light that is shaped in the map of the USA. Inside each US state, the video displays are used to represents the state using pop culture, an example is The Wizard of OZ playing in the Kansas state. NJP used the TV and the neons to represent his theory that television would be a highway to communicate information.

How was the photo or video published?
The only thing that I can find out about publishing is that the work was organized and made for the Smithsonian American Art Museum in 1995.

How was the photo or video distributed?
This work is one of a kind video art installation that was made for the Smithsonian American Art Museum in 1995. It has been housed at the Smithsonian American Art Museum in Washington D.C since 2002.

References: 

Wikipedia 2019, Nam June Paik, Wikipedia, viewed 10 April 2019,< https://en.wikipedia.org/wiki/Nam_June_Paik>.

The Art Story 2019, Nam June Paik, The Art Story, viewed 10 April 2019 <https://www.theartstory.org/artist-paik-nam-june.htm>.

Nam June Paik, 1995, Electronic Superhighway, accessed April 2019 <https://www.khanacademy.org/humanities/ap-art-history/global-contemporary/a/paik-electronic-superhighway>.

Week 5 – Analogue Photography (practice analysis)

Who is the practitioner (what is their name?) and when were they practicing?

Henri Cartier-Bresson was a French humanist-photographer. He was an avant-garde in street photography and capturing a decisive movement. Bresson started professional photography in 1932. He was also a founder of Magnus photos in 1947.

What is the title of the photo or video you have chosen to analyse (can you provide a link?)

The title of the photo is ‘Behind gare Saint Lazare’. I found this photo on 100 photos times website. I chose this photo for a few reasons because I enjoy the composition of the photo, how the water creates an effect of symmetry, the method behind taking the photo.

With the photo or video, you are examining when was it produced (date)?

Gare Saint-Lazare, Paris, France in 1932

How was the photo or video authored?

This photo was taken by a 35mm Leica camera with no flash. The Leica camera was the idea for the time as it was lightweight, good size handheld and had a medium shutter speed.

The photo uses the method he was famous for capturing decisive movement. The photo was taken through a fence of a train station where he saw the components of the photo come together for a brief moment and clicked his camera.

How was the photo or video published?

The photo was never published in the newspaper he works for at the time. This photo was published through print media. From my research, the photo was first published in Bresson’s book The Decisive Moment in 1952. This photo took around 20 years to be published as analogue photos before printing need to be developed, took time and had to be perfect. The publishers of the book were a New York company called Simon and Schuster.

How was the photo or video distributed?

Behind gare, Saint Lazare was first distributed through Bresson’s book The Decisive Moment. The original 1st edition of his book only had 10,000 copies. Since then multiple copies have been made even the 60-year anniversary edition of the book has been released. This photo has also been distributed through multiple art galleries such as MOMA. The negative is also on display at the museum of fine arts in Houston. The photo was also featured on Time 100 Photos prints. This photo has been distributed on the web in the digital age and can be found on multiple websites.

References: 

Henri Cartier-Bresson, 1932,Behind gare Saint Lazare, photograph, accessed April 2019, <http://100photos.time.com/photos/henri-cartier-bresson-behind-gare-saint-lazare>