Studio Reflection – Spatial Continuity & Matching Eye Lines

Today we did a practical exercise focusing on eye-lines and making sure they are aligned correctly.

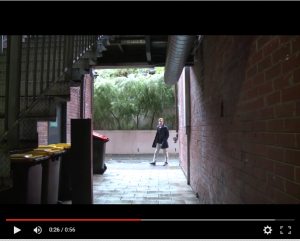
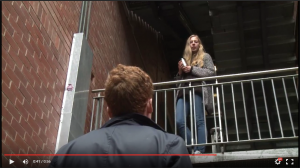
It involved a short scene in which two characters face each other and exchange a few lines. We were to capture a wide two shot to establish the physical relationship between the two characters and allows an extended silence that opens the scene. We also capture a clean MCU of Chloe for her line and a clean Mid-shot of Colin for his reply.

We position the actors optimally for Shot 1 but reposition Chloe for her MCU to take best advantage of elements such as lighting. In addition we were to shoot Colin’s Mid-shot in an entirely different space altogether, being careful to match the space, lighting and eye-line.

Ideally we were to learn the difficulty of repositioning actors and the camera while maintaining matching eye-lines. Furthermore, we were to learn that we can move the actors to get the best shot without ruining contunity. The excercise didn’t quite go to plan with the class seeming to get confused and go off-track a bit. Anyway I think most of us got the point and learnt from it regardless. As filmmakers manipulate exactly what the viewer sees and if we do this correctly then a simple scene of two people talking in a room dosen’t have to all be shot in the one room. We might choose to shoot part of a scene in different location due to lighting, something distracting in the background or maybe we have just ran out of time and will need to shoot the rest in the studio.

If eye-lines aren’t matched correctly in a scene its easily noticable and can ruin the whole viewers experience, so it’s important to get right. I find it best to always have the actor or object that isn’t in shot that the person is looking at physically there. What I learnt in my scene anaylsis of Silence of the Lambs is that eye-lines also have creative meaning within in the film. For instance when Hannibal gains power in the scene he looked directly down the barrel of the camera whereas looks off-camera, as she is off-balanced.


Sensor Size Exercise Plan

The following is the screenplay and plan for the sensor size and perspective excersice that I executed over the weekend.

SCENE 7         LIVING ROOM          DAY/INT

Gerry sits at a table doing the crossword.  Julia paces the room.  She goes to the window and looks out to the street.  She gazes at the sky, and then back down to the street.  She turns and looks at Gerry who, oblivious to her gaze, fills in a lengthy word in his puzzle.

Julia goes to a chair on which sits her handbag.  She rummages in the bag for her phone.  She checks the phone’s settings and drops it back into the bag.

After a moment, Julia goes to the landline phone, which is on the table near Gerry, and picks it up.  As she listens to the dial tone, Gerry looks up and their eyes meet.  She replaces the receiver in the cradle and averts her eyes from Gerry’s.  She folds her arms.

Shot List

# SHOT

TYPE

CAMERA

ANGLE

CAMERA

MOVEMENT

SHOT DESCRIPTION

(SUBJECT, ACTION, LIGHTING)

MLS EL Static MASTER SHOT of the entire scene
ECU HA Static Hand filling out crossword
MS EL Pan INT: Gerry focusing on crossword, Julia paces into frame, camera pans following her to the window,

Shot lingers until she turns around

CU EL EXT: From outside the window looking in, shows Julia gazing at the sky, then at the street anxiously. Julia turns around.
MS EL Tilt INT: Sky, tilts to street level.
OTS HA Static Over Julia’s shoulder looking at Gerry
OTS LA

HA

Downwards Tilt Over Gerry’ shoulder focused on Julia, tilts down to show Gerry filling in crossword.
CU HA Julia’s hands rummaging through her bag, pulls mobile out, checks, drops back in bag
CU EL Julia’s hand comes into frame and picks up phone.
CU HA Gerry looks up, locks eyes with Julia
ECU LA Julia looks away
MS 2SHOT EL Julia picks up phone, Gerry looks up, eyes lock, Julia looks away and crosses arms

Equipment:

Canon 5D (or other full framed DSLR)

Canon Zoom Lens

Tripod


Sony Z7

Tripod


LED Light Panel?


Props:

Landline Phone

Cast & Crew:

Male actor

Female actor

Camera assistant – help me with keeping a record of focal lengths, maintain continuity, focus pull etc.

Tuesday’s Studio

Today I helped Matt with his investigation Asymmetry which involved Sam and I throwing a ball to each other on the edges of the frame, with Sam sometimes jumping out of frame. This was to experiment with primarily using the sides of frame rather the centre.

I also helped Sam with his shoot which was to experiment with blocking and ‘reframing’. Matt and I acted out a short scene in which we moved around while exchanging dialouge. So we knew exactly where to stand Sam marked the positions with camera tape. We practiced blocking the scene several times before shooting both for the actors sake and for the camera, as Sam had to smoothly pan from character to character as he reframed. I thought it a useful activity to become fluent with camera movement and the process of blocking the scene.

Unfortunately I didn’t come to class prepared with an exercise. I still haven’t prepared a script for my sensor size exercise. I did shoot a brief exercise where I shot Matt at different focal lengths, moving the camera position (therefore focal distance)  to maintain the same frame. It was very basic but it does form the foundation of exercise, that focal length can change perspective. I shot him at an f.stop of 3 at 80mm, 50mm, 25mm and 10mm.

I’m currently thinking of how I should proceed with my next experiment. I think it would be best to shoot outside as the classrooms are very bland, with every wall looking the same etc. It would be easier to notice subtle differences in an enviroment with more depth. For instance, outside I would be able to see if the percieved distance between a character and a tree was different on each camera.

I’ve researched the exact sensor sizes of the Sony Z7 and the Canon 5D. The Sony Z7 sensor is tiny measuring a 1/3 of an inch. The 5D is full framed measuring at 35.8 x 23.9 mm (1.41 inches x 0.94 inches). Quite the difference so I think the physical focal lengths I’ll be using to maintain the same framing on both cameras will be quite different.


Sensor Size, Focal Length & Perspective

After speaking to Robin this afternoon I’ve decided to investigate how focal length will appear different on various cameras, due to the size of the sensor or film. I will compare perspective by using two cameras with very different sensor sizes. The Sony Z7 which has quite a small sensor and a Canon 5D which is a full framed DSLR. I plan on shooting the same scene with both cameras with the exact same framing, in which I’ll have to use different focal lengths to acheive. To acurately compare the shots I will have to ensure all settings except for focal length are the same such as the f.stop and color balance. Furthermore, the scene should have depth, by this I mean there should be objects/people in the foreground and background as so differences in perspective are noticable.

I think that the images from the smaller sensor camera will appear to have an increased depth of field as to have an equivalent field of view as the full frame camera it will need to have a shorter physical focal length. At the same f-stop this should corrospond to a smaller enterance pupil size and hence a deeper depth of field.

However, if I was to set the focal lengths on both cameras to same setting the smaller sensor camera would have a decreased depth of field and the fields of view would be very different. That’s why I wish to change the focal length in my experiment to get an equivalent field of view, which will make it easier to compare images.

Research Proposal – Focal Length and Perspective

As a student who often just wants to get things done, I find myself neglecting the potential of controlling the focal length and merely using it as a zoom to frame my shots. But as well setting the frame; focal length affects the depth of the shot, the relationship between visual components of the shot and the sense of 3 dimensional space.

I know that a wide angled lens seems to exaggerate perspective. The apparent distance between objects as they extend away from the camera will seem greater than normal, and the objects in the foreground appear larger than normal in relation. Contrastingly, long lenses appear to compress perspective.

It quite easy to point out the different effects of 16mm compared to 100mm. That’s why I wish to explore more subtle variations. For instance I might shoot a close up of a subject with a 35mm and a 50mm. Afterwards I’ll write in detail on how the perspectives vary. For instance how it might affect the appearance of the subjects face.

I’d also like to explore the effects focal length can have on a film as a whole. I’ve heard that a longer lens may give a film a more observational feel, whereas a wide angled lens might give a better sense of presence. So I’d like to experiment with this.

Basically for the next 5 weeks I’ll be experimenting practically by shooting short exercises with different focal lengths. In which I’ll edit and then reflect on in my blog. By the end of the semester I hope to have a complex understanding of focal length and how it can vary perspective in film.

Set Written Research Project – Montage and Mis en scene

In this post I set out to investigate the meaning of mis en scene and montage.  Mis en scene is french phrase that literally means ‘putting on stage’. Basically in film mis-en-scene is the arrangement of everything that appears in the framing. Including actors, lighting, decor, props and costume. The nature of the frame itself and the camera work is also considered apart of mis-en-scene. Its how the director chooses to what goes where and when within a frame. It’s important to note that mis-en-scene is made up of elements that appear within the shot itself, not the effects created by cutting these shots together like montage.

Mis en scene is collaborated effort between set designers, lighting crew, costume, makeup, location scouts but ultimately the director overseas the entire mis-en-scene and all of its elements.  Sometimes mis en scene can evoke emotions the set up precedence for the entire film. In Histories of Film Theory we watched the German expressionist film The Cabinet of Dr. Caligari (1920) which features distorted shapes and confined scenery to disturb the audience.

CABINET_DES_DR_CALIGARI_01


In france montage simply denotes cutting. At a basic level its the relationship between shots. So the process of cutting of film and editing it into a sequence. Montage can provide alot of information in a short period of time. When I think of montage I think of a juxtaposition of short shots to represent action or ideas. Theorist Sergei Eisenstein believed that  film montage could create ideas and have an impact beyond the individual images. A couple of weeks ago I watched Eisenstein’s Battleship Potemkim which was a great demonstration of the power of montage, as he manipulates the audiences perception of time by stretching out the Odessa stair sequence making it longer than it would take in real life. The quick progression of images gives the impressive event even more visual impact. This film also represents ideological potential of montage as it is a call to the people to rise up against oppression.

So Mis-en-scene is the arrangement of everything that appears in the framing and montage at its most basic level is the relationship between these shots. Montage and Decoupage seem to be quite similar concepts that could easily be confused with each other. Decoupage generally seems to apply a single space whereas can also apply to multiple spaces aka. parallel montage. Furthermore , decoupage is about pre production for instance the script with all the technical information for instance the mis-en-scene, camera placement, actor position etc. Whereas montage seems to be associated more with the post production and the editing cuts themselves. Montage is more of an editing style whereas decoupage is the underlying structure of the entire film. Decoupage is the process of how the film is mapped out to establish spatial relations. However from my understanding montage tends to be more about temporal relations between shots.


30 Minute Experiment

In class we split into groups of four and each of us had 30 minutes to experiment with something of formal interest to us. We worked efficiently and everyone got their exercise done in under 30 minutes. It was worthwhile practice to aid each other with these experiments as we learnt from our different formal investigations. For instance, Matt wanted to experiment with shallow depth of field by having someone run into focus. We realised to achieve shallow depth of field we had to move quite far away from the subject so we could use a higher focal length accompanied with a wide open aperture. I know generally better to have the lens close to the subject but we couldn’t as we needed to get a full shot and the character had to be easily visible when he was far away. This gave us all a better understanding of how to control depth of field and problems that can come with it.

I choose to explore covering a dialogue between two people. It was quite simple but it’s actually something I haven’t had much experience in. As I couldn’t think of a script I chose an excerpt from the TV series Mad Man but shot it in the way I wanted to. I had a good idea what I wanted to the final cut to look like but I wanted to make sure I had ideal coverage of the scene to give me options in the edit suite. I followed what I had planned and everything went smoothly. To use our time efficiently I made sure we shot all the coverage of each character in a block, avoiding excessive camera setup/movement. For most of the shots I made the actors run through the scene as we had time and it would give me more options later as well as help ensure continuity. Some of the shots, for instance the close-ups I only captured for certain lines that I thought I may want to emphasise.

There are some issues in terms of lighting, exposure and setting but this was primarily an exercise on what combination of shots to use to cover the scene. I think maybe a few of the cuts might be a bit distracting but I’m not entirely sure. I think all in all I did a good job of covering the dialogue.

It was interesting how Sam’s performance totally changed the tone of the scene and actually slightly changed how I shot the scene.


Over and out,

Luke

My Understanding of Coverage/Decoupage

I knew the basis of what film coverage was when I started this course due to doing Film3 last year. However, I understood it in its most simplest form. That is that coverage meant having enough footage to cover the scene. Is this scene covered? I was thinking purely about the function, efficiency and ultimately giving the film editor options.

Ive now come to understand the coverage is equally about creating something visually interesting and dynamic. Coverage creates the flow of a film and can convey emotions and tensions. Bunnel talks of decoupage (coverage) as the ‘cinematic embryo’ of film meaning that it’s the element that brings the medium to life. You may have a great script and great actors but without decoupage you are left with theatre, not film.

I’ve learnt that you can have enough shots to cover a scene but to achieve good decoupage you want ideal segments. A shot by itself hardly means anything, it’s when it’s strung together with a variety of shots that makes it have meaning. This leads me to something I’ve increased my understanding of greatly throughout the last few weeks. That is the idea of creating filmic space. What makes a shot special is its spatial and temporal relationship with other shots that build the scene. Through this we create a 3d space in the viewers head in where they have an idea where the characters are positioned in relation to each other. I’ve learnt how to do this without distracting the viewer and damaging the ‘filmic space’

The studio so far has definitely greatly ehanced my understanding of film coverage. Looking forward I would like to learn how to cover more complex scenes. For instance I was wondering how cover a scene with say 10 people sitting around a round table. How do I create spatial map in the viewers head where everyone is sitting and how do I ensure I don’t cross the line? Maybe this is something I will explore in a future blog.

Over and out,

Luke

Excercise 5B Reflection

Last week we split into two groups and filmed a scene given to us by Robin. Ours was a scene featuring two female characters walking up some stairs while being followed by a third male character.  It was good to work in a group where we all had our roles in which we worked quite efficiently. We had three actors, a sound/boom operator, camera man and director. I assisted the cameraman, operated the clapboard and made sure none of the equipment got wet. It was interesting working in the rain, it made me appreciate what camera crews go through on bad weather days. We had to be careful when the cameraman was filming the two actors walking up the stars as he moved backwards as the stairs were wet. To be safe I stood behind the cameraman, with my hand on his back and led him up the stairs, prepared to catch him if he fell. It also helped guide the camera along the proper planned path.

I think we did a decent job to film this in one class especially with the range of shots and angles we used. For instance we used a dynamic handheld shot and wide shots with both extremely low and high tilted angles.

During and after the editing process I did notice a few errors with the edit of my scene. For instance the continuity error in this moment captured below. While the man appears in the distance we should see the two after characters continuing up the stairs. This would only be OK if we captured them stopping and heard them talking for a bit and then continued up the stairs. Continuity Error

Furthermore, later in the scene the camera crosses the line and it distracts from the scene.  It looks like the characters are in a totally different place within the scene.

Cross the line 1Cross the line 2

Besides a few errors, we did quite a good job of covering the scene. It was a worthwhile exercise. Especially because the location of the staircase made us think more dynamically of how we wanted to cover the scene. It really made think of the audiences spatial awareness of filmic space and how eye-lines, angles and position must match up to create this 3D space.

Experimenting with a dialouge scene

Experimenting on Tuesday   

Time: 30mins

I’ve decided to experiment with shooting a simple dialogue scene between two characters featuring over-the-shoulder shots, cutaways and shallow depths of field. Quite a simple concept but I’d like to master how to shoot dialogue while keeping it interesting and maintaining the audience’s filmic spatial awareness. By following the 180 degree rule I will ensure the characters are looking in the right direction on-screen.  Because I couldn’t think of anything to write myself I have extracted a segment from an office scene from the TV series Mad Men. This scene is originally covered with MS and MCUs with only one characters ever being in the frame at once. I plan on adding some over-the-shoulder shots and some shot size variation to attempt to make the scene a bit more interesting. There’s 6 shots in total and thats without giving me any options in the editing suite. I should be able to get them done in 30 minutes if I shoot the three shots of each character together. Below is the script I copied from a scene from Mad Men and a youtube video of the scene
INT. STERLING’S OFFICE – DAY


Harry  sits down facing Roger

ROGER

Now.. I think you know that we like to think of this place as a family. And there are certain ways a family behaves.

HARRY

(Worried) What did she say? You have to hear my side of it.

ROGER

(Confused)  Your side of what?

HARRY

What– Nothing.

ROGER

You’re always up to something aren’t you Crane.


SHOTS:

Medium Full Shot Pan – Harry walks over to the seat and sits down facing the desk. Shot from behind the desk from the left Roger.

MS OTS – Roger behind the desk from the right of Harry

MS OTS – Harry over Rogers left shoulder

MS – Roger behind the desk

CU – Harry confused

MS OTS – Roger from Harry’s right shoulder.