Progressive & Interlaced – What’s the deal?

Over the course of my film making journey i have always filmed in progressive scan but since starting my studies in the Bachelor we have been filming in interlaced scan, so i asked myself what is the difference?

Progressive Scan is recording one still picture in its entirety one after another in rapid succession. Depending on the frame rate which can be 24 frames per second (Pictures) when making a film and 25 frames per second (Pictures) for television (Australia).

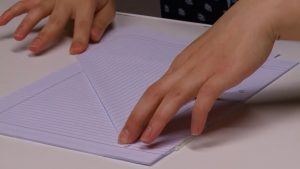
Interlaced Scan is taking each single image and dividing it into an even amount of lines horizontally, once we have done that we erase all the odd lines away from the first image leaving you with half the information. With the corresponding image we take away all of the even lines to again only have half the information. Then the two images are put together to create a frame (Refer to image bellow) Usually interlaced video is at 50i or 60i frames per second.


So why use interlaced if we are only retaining half of the image? Well interlaced was introduced through television broadcasting production because when sending information to your television progressive file sizes were to large interlaced gave half of the file size while retaining great image quality.

As the half images of interlaced are processed quicker than a progressive capture, there is less time for the subject to move within the capture time and so the movement can be crisper and cleaner.


I found after editing in premiere pro and exporting the video, when i played it back i found i had a few issues with the image quality. When there was heavy movement withing the frame the image showed artifacts. What i found out after some more investigation was that modern day computers/laptops playback video as a progressive scan so what my computer was trying to do was change my interlaced image back to a progressive one. But the interlaced images only have half of an image so that resulted in the video showing artifacts and lines.


I was able to fix this issue in premiere pro by de-interlacing the image before i exported it and then upon playback the image had none of the previous artifacts.

Upon review of which type of video scan i prefer it would have to be progressive but i will still hold out my final judgement until i have conducted some final tests.

I hope this blog post wasn’t a boring one (Sorry) but i do find this kind of information fascinating and i am always searching to learn more about the different methods of film making. Also if you are having the same issues with your video i hope that this helps you.

All the images i sourced from : https://photography.tutsplus.com/tutorials/choosing-progressive-versus-interlaced-video-recording–cms-22302 if you want to read about it further.

This is the end of another post so as always until next time this is Lance signing off.


Expertise Exercise – The art of Pen twirling & Origami

Task:

Create an expertise video using only 3 shots.

-Someone in the group has to come up with an action that they feel they are expert at.

-The remaining people in the group had to film and record audio for the expertise action using only 3 shots.

-There is a big emphasise on audio recording, incorporate it into the video.


When put on the spot it’s kind of hard to think of something that you’re particularly good at. During my final years in high school, to pass the time I practiced a nifty way of twirling my pen in my hand that I still do today as a reflex when I am thinking. So I decided this would be my expertise.

I was tasked with filming my fellow classmate Grace, who was going to make paper origami for the expertise exercise. We decided to use the couches and tables in the editing suit space because it was quite enough for what audio we needed to capture.(Paper ripping/folding) I took into account the action and the sound when constructing my shot list as we were only tasked at taking 3 different shots, I decided to use the coverage of a wide, mid and close up knowing that I would be able to easily match cut between the three.


Audio was recorded separately on the day as well as scratch audio in the camera, this was to make it easier to sync up in the editing process. The Mixer that we used was amazing at recording clear and precise audio, when putting it into premiere pro and syncing it I had trouble with one clip not matching. I couldn’t figure out why this was happening but what was great about Graces expertise was that it has clear moments in the video where sound was present (Ripping) so this was easy to manually match to the vision.

When I decided to edit I used the technique called the match cut, specifically using the audio ques recorded on the day to help mask the cuts (Cut from wide to a close up on ripping action) I found that even though my shot list was quite simplistic in nature the use of the audio cues and match cutting gave the video something dynamic and engaging. The space became vast and all the attention was on grace and the action at hand.

I think that the aha moment for me was the fact that at first I was doubting my shots as being to simple but when edited together with the sound at the forefront you can create something quite engaging and dynamic. The sound recorded on the day helped to create this atmosphere and space in the video that I will continue to think more about when filming in the future. I think that a lot of people put to much emphasis on the way something looks visually and always think of audio asa post production process when it must be properly thought about prior to pressing record.


https://drive.google.com/a/rmit.edu.au/file/d/0B6U3RRzXVzXgUFNCVGVXNlhYVnc/view?usp=sharing


Trouble syncing audio with second expertise video:

My group had trouble syncing the audio of the second expertise video. Premiere was not able to match the audio from the mixer with the audio from the camera.

Why did this happen?

Well what I think happened was that the location we filmed in had a lot to do with the problem. Overbearing sounds like the helicopters in the sky, protesters in the distance chanting and I humming noise coming from an electrical system were to loud and masked my simple action. The scratch audio coming from the cameras preamps would only pick up these louder noises and not the simple noises of me tapping my pen and spinning it, while the mixer with a more directional mic was easily able to distinguish between the different audios. That is why the two clips couldn’t match because they recorded differently.

This is something I will have to remember in the future, there needs to be a slate que or something along those lines that both the camera’s audio and the mixer’s audio can capture together to help with the syncing process down the track in premiere because my group had a hard time matching up the audio with the video.

And so another exercise down and another lesson learnt, so until next time this is Lance signing off.

01 – The Rule of Thirds

What is the rule of thirds in regards to film making?

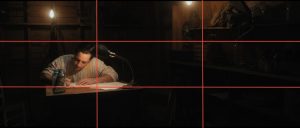
The rule of thirds is a method used by film makers (And artists) to help create a pleasing composition, the frame is broken up into thirds, vertically and horizontally, intersecting to create 9 equal squares

.


But why use it? Well what artists and cinematographers have proven that the intersecting points are a good indicator for where the human eye (Audience/Viewer) is drawn to. Aligning a subject with these points can create more tension, energy and interest in the composition than simply centering the subject.

  • Putting your subject on the left third or the right third can have multiple meanings. It can be as simple as giving the subject looking/talking space. It can also be used to give the subject negative space creating tension.
  • The first horizontal line is a good indicator for a subjects eye line.
  • Landscape horizons are best used in the rule of thirds when they are along the first or second third horizontal line.

Film makers are always searching for a visually pleasing shot, to create something really cinematic. What i think makes a shot cinematic is that is has the ability to make the shot have a deeper meaning. To make the viewer engage in the image asking themselves questions about the story. This is what i strive to be able to achieve in my film making journey. I hope you enjoyed my brief explanation of the rule of thirds i will be exploring this concept and others further in this blog series until next time this is Lance signing off.


Seeing Things…. 2017. Rule of Thirds | Seeing Things…. [ONLINE] Available at: https://charlieparsonsblog.wordpress.com/tag/rule-of-thirds/. [Accessed 10 March 2017].

NJ & NY Video Production, TV Commercial Production, Film Production, Music Videos, Corporate Videos, Kvibe Productions. 2017. Understanding, Applying, and Breaking the Rule of Thirds in Film and Video Production | NJ & NY Video Production, TV Commercial Production, Film Production, Music Videos, Corporate Videos, Kvibe Productions. [ONLINE] Available at: http://www.kvibe.com/2017/02/24/understanding-applying-and-breaking-the-rule-of-thirds-in-film-and-video-production/. [Accessed 10 March 2017].

Exercise 1 – A Reflection and “Ah ha!” moments

“I want you to create the first shot of the rest of your film making lives” Paul

Restrictions:

  • The focal length has to be 12mm.
  • The shot can only be 10 seconds long.
  • You can only have 1 take.

Our first practical exercise for True to Form and I have absolutely no idea what I’m gonna film. We have been grouped together so I have strategically let everyone go first hoping that it will spark an idea for me. The hallway! I’ll use the hallway, I decided to get Ryan a fellow classmate to be my subject. I decided to frame him in the centre of the frame letting the lines of the hallway draw the eye to the doors at the end of the hall. As Ryan walked down the hallway he is sucked into the centre of the frame.

Execution & Reflection

These restrictions may at first have seemed to have really made it hard for myself and group members to compose there shots but I can see that the whole point of the exercise was to really think about the composition. What are you trying to show (Or not show) in your shot? These are the questions you need to think about before you press record. In regards to execution, with some explanation people might look back at my shots and think hmm, ok yeah I see what he was trying to do, but I feel like the majority of people at first glance would just be like “Meh”. So if I was to have a second chance at the same idea (Utilising the same space) I will bring the camera to the same level of the subject and frame them to the right hand side. I will still use the lines of the hallway to draw the eye. I feel like this gives a more dynamic shot for the subject we feel more connected to the sequence.


What about everyone else what did they film?

Upon looking back at the footage in class Paul gave us some critical feedback about our shots. He kept coming to the same conclusion on most of the shots and that was we were not using the Rule of Thirds. I knew about this technique before but I honestly had never really put too much thought into it when I composed my shot. Some of the shots from the class that gave me this “Ah Ha!” moment about the Rule of Thirds were from the following shots.

Paul gave us some critical feedback as a group on what we had filmed. He kept coming back to the same conclusion, The Rule of Thirds. I know of the concept (the image is cut into three equal halves horizontally and three equal halves vertically intersecting to give us 9 equal squares. Composing your subject on the intersecting lines.) but i do admit that i didn’t give it any thought when i composed my shot. I will research this concept further and continue to use it in my upcoming shots this semester.

“Ah Ha” Moments

Upon review of other students work in class, i was really inspired.

  • The rule of thirds
  • Highlights & Shadows
  • Negative space
  • Vertical lines
  • Movement


“Ah Ha” These are all concepts i should be utilising in my use of composition. I will strive to become more knowledgeable of these techniques and concepts. So until next time this is Lance signing off.


True to form – The Journey Begins – Blogging and self-evaluation.

And so, my Journey into my third year of study has begun. I will be taking my leap into the big wide world of blogging, I hope that what I write isn’t the same old dribs and drabs that everyone else talks about I want this process of blogging to be a therapeutic one. A place I can let out all of my thoughts and opinions on films, film making and general pop culture. After 2 years in the Vocational sector of RMIT (Building 94 Represent) I will be stepping up to Higher Ed at Building 9. So, what have I learned in my 2 years?

Well the first thing I learnt was that there is a whole lot more significant areas in film making then a Director and Cinematographer . Film making is a vast sum of parts all working together to make art and a lot of thought has to be taken in ALL aspects of the production not just a nice-looking image. Surround yourself with passionate people, work with talented people that you get along with. Never work with someone you don’t like and you can never know everything there is about film making!! You should be always learning.

Coming from a trade background (Metal fabrication) I have found that I have a good understanding for the technical side of film making, Cameras, Sound, Lighting and editing workflow jargon is what I am good at. People can look at a camera and find themselves unsure about what all the buttons do, I enjoy the challenge. One of my favourite pass times is reading up about all the new cameras and there specs, knowing quite well that I could never afford them.

So, what is true to form? What am I hoping to get out of it all?

Paul talks in the studio guide about the methods of film production being predetermined by the choice to either make Documentary or Drama. Setting the form and often the content. These methods have their practicalities and require a commitment to a particular form and its methods of production but this can limit the film’s expressive potential.

True to form is that the content of your work will be determined by your creative vision while having respect and a deeper understanding for the subject matter in the process of shaping the final form.

What I want to get from the True to Form studio classes is to be true to myself, be open minded to the nature of the studio and to gain a better analytical understanding of film making, composition of a shot, focus, exposure and constructive reflection to my own work. What I have a real hard time doing is being able to articulate my thoughts constructively. I always end up hating everything I make; I would like to say I’m a perfectionist but I look at the negatives of my work. When I should be looking at the positives and looking back at where I started to where I am now which is a big leap.

Some goals/aims for the semester:

– Be able to express myself analytically and analyse my work through reflection.

– Be True to form.

– Gain a deeper knowledge of cinema.

– Pass the semester with flying colours.

– Make/ Work on my own projects, Short films and Webseries.

– Make new friendships and connections in the industry.

And so, my first blog for the year is over. I am excited for the upcoming year and all that will come with it. Until next time this is Lance signing off.