Film Light Studio Reflection

Overall I thoroughly enjoyed taking part in the Film Light studio this semester. When it began, I made it my personal goal to learn more about cameras, especially including how to work with elements such as depth of field. Overall I hoped to gain a better understanding of cameras and be able to confidently use one independently. Additionally, I wanted to learn more about cinematography and expand my knowledge on what makes cinematography “good”, through informed analysis of films and my own work. I hoped to increase my appreciation of cinematography with a better view of the craft.

I can definitely say that I achieved all of these goals, and more. It has been extremely interesting this semester to gain not only a great understanding of cinematography, but also to delve into other roles too. I feel I learnt invaluable information about film light that I would not otherwise have known, and it is not only purely interesting but also incredibly useful for my future in my degree and beyond. I felt that doing this studio allowed me to release creativity in instructive ways. In terms of the assignments, I think the nature of having them be experiments where we, as individuals and groups, could explore particular elements of film lighting was an excellent way to learn. Also, by not setting a task like creating a short film, we were able to fully focus on film lighting and have the other elements secondary in the task.

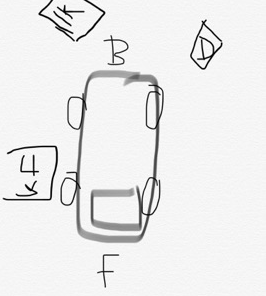
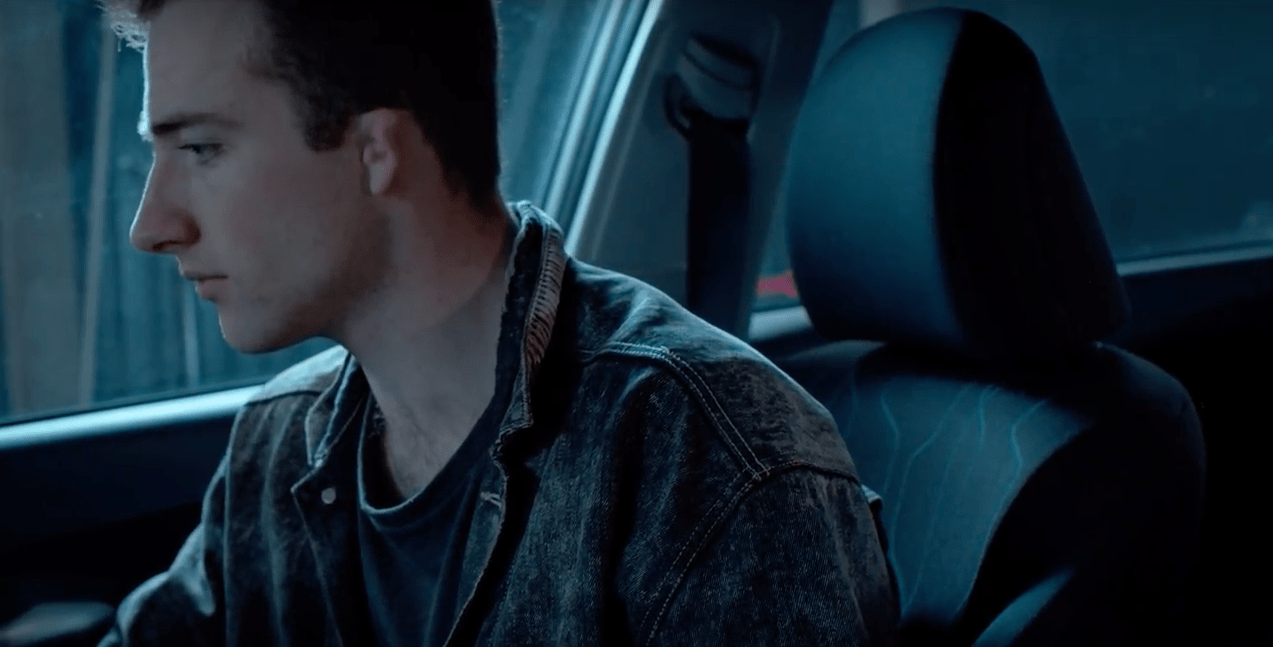
When screening our work, I think it was good that we showed both experiments. In the first, it was clear we were aiming to imitate particular frames. Although we did not explain that we were using only one light and two boards, I think we still showed that we had learnt from class what variables were necessary in order to achieve the lighting. Also, as the cinema screen was big and the first time we had seen our work on it, it made any mistakes or elements we were not happy with quite clear ( to us at least). For the second assignment, I think it was clear that we used lighting to primarily establish a mood to the scene. Like has been discussed in the studio, this is not decided without other factors – casting, sound, production design – to name a few. For example, we manufactured a lighting setup that looked nice for each subject’s face.

If I were to extend the second piece we created, I would explore the scene taking place outside of the car, and even using no lights. This is an experiment I would have liked to do had we had more time, or even another assignment. Making it a 3-5 minute scene, where we get to explore the characters more and have that moody overcast natural lighting could make a very cool piece.

I think James, Chloe, Tash and Jonah explored this idea in a way, as they used only the light available to them for the scene. I think this was an interesting idea to work with because they had to be creative with what was in front of them. Additionally, they took inspiration from The French Connection, exploring moving through spaces with different colour temperatures. If they were to go further, I would like to see where they could find colour temperature beyond just the available light, and even manufacture it.

Ada, Karida and Rain also explored differing colour temperatures, with a memorable shot of the warm interior lighting and cool toned light from the exterior. It looked quite effective to have such a stark contrast in the shot, and I especially liked the rain on the window displayed in one of the shots. In contrast to the other group, they manufactured the contrasting colour temperatures, similar to the Venom inspiration in their presentation. I think this was a natural progression to the ideas of colour temperature we had learnt in class, and just goes to show that there are many ways we can go about achieving a certain style or look.

I think being an audience member at the screening was a lot of fun and it was great to see an amalgamation of all our work in one. It was especially cool to see how every group had adapted those ideas from class, and what directions everyone went in. I definitely grew an appreciation for the work put in, especially seeing where some experiments had developed from the previous. Like in class, it was a delightful experience to watch back everyone’s work, and equally as enjoyable to reflect on this work and expand on some ideas. If Film Light has taught me anything, it is that watching films and other’s work is one of the best ways to expand my knowledge on cinematography and film lighting.

Index: Assignment #4

Week 7 Reflection: https://www.mediafactory.org.au/eleanor-holloway/2019/09/15/film-light-w7/

Week 8 Reflection: https://www.mediafactory.org.au/eleanor-holloway/2019/09/18/film-light-w8/

Week 9 Reflection: https://www.mediafactory.org.au/eleanor-holloway/2019/09/26/film-light-w9/

Week 10 Reflection: https://www.mediafactory.org.au/eleanor-holloway/2019/10/15/film-light-w10/

Week 11 Reflection: https://www.mediafactory.org.au/eleanor-holloway/2019/10/15/film-light-w11/

Week 12 Reflection: https://www.mediafactory.org.au/eleanor-holloway/2019/10/15/film-light-w12/

Group Presentation Response: https://www.mediafactory.org.au/eleanor-holloway/2019/10/15/group-presentation-response/

Experiment #1 Reflection: https://www.mediafactory.org.au/eleanor-holloway/2019/10/15/video-piece-1/

Experiment #2 Reflection: https://www.mediafactory.org.au/eleanor-holloway/2019/10/15/video-piece-2/

Video Piece #2

Link to experiment: https://drive.google.com/open?id=1jMbXZtpO8WmsHasXbHn_gEMaSaz03eXk

For this experiment, our first vision was to see how we could light a car. Compared to the last assignment, we knew that we needed to bring more movement into our footage, and in turn work with more of a scene rather than stills.

I knew that inevitably when we filmed it would be a rainy day, so setting the mood as dramatic was going to be the way to go. By using the blue gel, we could get this desired look. For our equipment, we used a Kino Flo, a Dedo, and a 1k Fresnel. Additionally we had c-stands and shot bags. Here is a poorly drawn diagram of the general setup of the day:

[1k: 1k Fresnel, D:Dedo, KF:Kino Flo, F:Front of Car, B:Back of Car]

With each shot we finessed the setup to how we liked – so for some of the shots each light was on or off depending on the look we were trying to achieve.


Personally, I really wanted to ensure there was modelling on the faces of the subjects. In some of the shots, the light was behind the subject, creating the edge on the face and defining. For the following shot, the lighting is expressive for a dramatic scene: we see the tense facial expression as they need to take off from the “mission”.

In the shot below, the light on the face is even and well-exposed. the shadows appear under the chin and on the back of his neck from his shirt, and the light captures the edge of his profile (from the Kino Flo outside the car on that side). 

Similarly to the last experiment, we did not take record of the specific camera settings we used. I think this would have been useful to reflect on after, additionally if I had taken some photos while shooting of each of the shots we got. Mainly the process was to set up, and then finesse until it looked how we liked. After the last assignment, I think in this one I felt very involved and had my say in both what shots we were getting, and also how the lighting ended up looking.

Overall, I am pretty happy with what we have achieved, I think we managed to get some really nice shots with a clear mood and tone established. I am especially happy with our use of the blue gels to create a fairly consistent look – as the sun moved in and out of the clouds that day. It was a shame that we could not achieve more coverage, as I really wanted to explore some handheld mid-shots or close-ups of a subject walking to the car, and see how we could work with the natural lights and just some bounce boards. This is something I hope to explore in future projects, as I really have an interest in modelling on the face in lighting, as we introduced in the experiment this time. From performing this experiment, I think my most important lesson learnt is that it is definitely a challenge to not necessarily have continuity in the shots, but consistency in the mood and aesthetic. I think we were almost there, but after looking at all of the clips separately I could see that there were some discrepancies. Overall, I look forward to incorporating these things learnt into future projects.

Group Presentation Reflection

The experiment on silhouettes by Joseph, Terance, and Tully caught my eye as it was a very instructive and informative process and then presentation. I chose this presentation to reflect on because I think they chose an interesting study of silhouettes, and they are not something we have really explored in class. Their experimentation was performed in a way that they could be meticulous in their study and come up with  good solid evidence on what was found.

Their  detailed recording of their findings is similar to how iI would conduct something of that nature. This is something I regret from my own group’s work, because now I do not have any record of how we achieved the shots with the camera. I liked that they  put particular emphasis on the different variables and carefully discussed what it is that changes when these variables change. This is something that I have touched on in some of my previous reflections, and it is generally a process that tremendously helps my learning.

Personally, my favourite look they achieved was the shot of the completely flat silhouette, as they achieved a cool inter-dimensional look between the two subjects. I also liked that they particularly looked at the lights wrapping around the face, and what they could achieve in performing this a few ways. I think from this experiment, they have gained a great knowledge on silhouettes and in future will be able to achieve certain shots and styles.

As was pointed out, it would have been good to see some movement across the foreground and background (and vice versa) to see how the light interacts with moving subject. This being said, it was not really the aim of their experiment to do so. Similar to my own group’s piece, the focus was on more of a still image rather than a moving scene.

I believe I genuinely learnt a lot watching their presentation and it has inspired me to look out for silhouettes in films and think about how they may have achieved the look.


Video Piece #1

Link to the experiment: https://drive.google.com/open?id=1nIN0vjnPfu5xUgGjiixQJBH1h_S7grwc

The aim of this experiment began, in the planning stages, as this: how many lighting setups can we achieve with only one light? Due to this, we were to only have one 2k Fresnel light, one black core board and one white.

Along the way, we thought that providing ourselves with some references as a guideline to some of the looks we could achieve would probably be a useful step, so we could avoid mucking around for hours on end without any solid game plan – so we put forward some ideas of particular shots or general looks that we thought could be something to aim for. I thought of Lost in Translation, which I remembered to have a majority of soft lighting with heavy fill throughout. The following still is what I drew inspiration from:

Scarlett Johansson in Lost in Translation (2003)

(found on IMDb <https://www.imdb.com/title/tt0335266/mediaviewer/rm3925624832>)

It worked out well that the other few we thought of were quite different to this, which aligned with our initial idea of creating contrasting lighting setups. On the day, we managed to obtain all the equipment we needed with not much difficulty, which set us on good stead for shooting. After setting up for a bit, we were able to freely move the light and boards as we pleased. Our process was to look at the direction of the light, if it was hard or soft, what fill was present and what the colour temperature was in the frames. We then set up the room accordingly.

During the presentation later on, it was expressed that achieving these looks in about two hours was quite an achievement. To be honest, I agree with this as I I do not think we were expecting to get through so smoothly either, however we found that once everything was set up, all we had to do was essentially copy what we saw in the frames. There were limits too, because we did not have an infinite amount of equipment, or even the same amount that we usually have in class. I think we were efficient with our time because we knew when we were happy enough with what we had done, given the limits we set ourselves, and at a certain point, there was not much more we could do with only one light and two boards. For example, in the Her frame, there was no way we could get that light on the top of the subject’s head and directly behind, so we got it just as far as we could. We wanted to keep the black background in all of the shots too. Additionally, when we could see that there were some other elements we could add, we avoided doing so because we wanted to stay true to what we set out to do. For example, in the It shot, we did think about finding a mirror to catch the light in the eyes but we just did not end up doing it. In hindsight, we maybe could have tried these things – given we were already set up.

In terms of my personal participation, I felt as though I did not speak up as much as I could have, or had that creative input that I felt I could bring. I guess at this stage I am just not so confident in my abilities and knowledge, especially being in a group with others that are. In future, particularly in the next task, I will just go for it. Overall, I had a lot of fun performing this experiments and I am keen to start the next piece.


Film Light W12

The last week of Film Light classes! I am sad to see it go. I have thoroughly enjoyed learning and creating lighting, and watching some really great excerpts from films. I feel like I have adopted a new eye for watching movies, and can have informed viewing. With that being said, I will reflect on an informed viewing for this week…

This week I went to see It: Chaper Two and I noticed some particular lighting choices. In one scene, the characters are walking, and the setting goes from dawn, to sunrise, to daytime. In the dawn, the temperature was cool, and omnidirectional. at the “sunrise”,  the sun was clearly high in the sky, but edited to look like a sunrise – through very orange filters, and having the sun bright in the camera. There was even a lens flare to indicate that the sun was not near the horizon. And then in the daytime, the sun was right at the top of the character’s heads. These were three fairly short shots, and I assume the characters were meant to be walking for about 1-2 hours overall, so I understand the idea of what they were going for – showing the time passing. I also understand that we can film an edit in a certain way to help the audience believe the time of day it is in the movie. But I just cannot let go of what I saw In Marie Antoinette, so I will forever be watching these particular shots and wondering if they really did it at the time.

I think this week I enjoyed reflecting on aesthetics of a whole film and how a cinematographer creates continuity in style. For example, in American Beauty, I can visualise the whole film, bundled up in my mind. I think that is something to consider when shooting something that may not be able to have a necessarily accurate continuation of lighting over different shots. I think if I can capture the mood or aesthetic of what I am doing, the audience will believe it. This is just one of the many things to consider whilst both shooting, and being an audience member. If anything, at least I have way better informed viewing of films than I did at the start of the semester. I truly have an appreciation for cinematographers, and lighting departments, and I hope to continue my own learning through watching movies from all sorts of times and places to expand my knowledge.

Film Light W11

This week, I was not present in the Tuesday class, but I spent this time thinking about some cinematography by Lance Acord in Marie Antoinette (dir. Sofia Coppola). I specifically thought of this scene: https://www.youtube.com/watch?v=1pOwUXr_SpM which, after know having studied cinematography, I actually have some problems with. I will start by saying that I really enjoy the cool temperature, and there is a really nice exposure on this shot of Kirsten Dunst:

I like they way the soft light wraps around her face, and the low exposure combined with the blue sells it as being at dawn. However, as the carriage moves, sunlight starts to flash past her face, when the scene is clearly set for the sun to be behind the horizon. In the following image, there is a shadow from the trees on her face, indicating they have filmed this in the middle of the day, with the sun high in the sky. Why didn’t they try to hide this?

I suspect someone liked the effect of it, perhaps it gave the scene more visual interest, or even just looked nice to shape Kirsten Dunst’s face. Still, it is distracting for me. Later in the sequence, they have this shot:

Which looks beautiful, but places the sun about four hours behind the shot previous, if it is the sun and not just a flare between the trees. I understand the effect they were trying to achieve, and added to it with playing with colour temperatures, but for me now it is too distracting to believe it.

This week we discussed post-production editing and the notion of, “we will just fix it in the edit.” If I have learnt one thing from this class, it is that it is possible to go as far as you can with on set variables in order to achieve a desired look. I would like to see this approach appearing in films and television I watch, because I think sometimes I am watching something that has been so heavily edited or colour-graded, that it loses depth in terms of artistic or stylistic shooting. I like that we can learn more by attempting things, and improving our skills, which is always going to make our final product look better than if we were to rely on editing it in the future.

Film Light W10

This week, we began by seeing each group’s presentations. As I am writing a reflection on one of the groups, I will not delve too far into my thoughts. What I will say is that I find it fascinating to see what others in the class are interested in exploring and how they have approached the task. I liked most people’s approaches as an experimentation – usually asking a question of themselves, how can we do xyz? Similar to our own experiment, where we aimed to only use one light, there were explorations of a certain aspect of film lighting, and seeing what they could do with it. I liked one of the presentations where they aimed to establish three distinct moods with the lighting, and see what they could come up with. I think this was good because it incorporated most variables in the process of shooting and editing – they were not only thinking about purely lighting, but also costuming, music, and props. One of my favourite parts of this class is to watch clips back and think about how the scene made me feel, and why did it do so. These explorations of mood and tone in lighting is something I would like to explore further in my own work, and continue to look for when I am watching films and television.

Also this week, we continued to watch some clips from other movies. My favourite was from Kes (1969), which had that great shot of the man walking into the shop. Both the exterior and interior were perfectly exposed, with fill used to help light the interior. Additionally, lighting these scenes whilst shooting on film, and having to estimate the exposure with the use of light meters is impressive, and not something I consider having grown up mainly watching movies shot on digital cameras.

Additionally, looking at the Carlos scene with the different colour temperatures, I think it is interesting tp think about how we as viewers acclimatise so easily to what we really cannot consider as reality. It relates to the lighting in black and white films, too, and how illogical a scene can really be. I think when temperature and saturation is changed or warped in some way, we perceive a scene so differently and quickly accept it to be the reality. I will definitely try to look out for this in the future.

Also, as an interesting point to end on, I could appreciate the emphasis put on the value of determining lighting by looking at the scene rather than looking through a viewfinder. After thinking about this for a while, I have tried to put this into practice more while shooting things, even just taking pictures from my phone. I think I can pick up so much detail in lighting from what I see with my own eyes, versus just looking at how my camera picks something up. This is especially true for lighting on a person’s face, which can reveal so much in a subject, and can shape someone quite nicely. I think I will definitely consider this while lighting future projects, specifically when lighting people.