How does focal length affect percieved perspective?

As a student filmmaker who often just wanted to get things done I found myself neglecting the potential of focal length, using it as a mere zoom to frame my shots. However, I knew choosing a focal length was a more complex decision than simply what’s convenient to frame a shot. For this reason, I chose to focus on focal length for my individual research project for the second half of the semester. I set out to explore the function of different focal lengths and its effect on perceived perspective.

I began my research journey with an exercise that compared physical focal lengths in relation to different camera sensor sizes. I shot the same scene with two cameras that had different sized sensors: the Sony Z7 which has a tiny 1/3 inch sensor and the Canon 5D which has a full-framed sensor the same size as 35mm format film. By shooting on the same settings on both cameras from the same position changing only the physical focal lengths and ISO when needed I was able to compare the aesthetic and practical difference.

I knew from the beginning I would have to use much shorter focal lengths on the Z7 to obtain the same framing as the 5D footage in which I shot first. The shorter physical focal length corresponded with a smaller entrance pupil size resulting in a larger focal area. Furthermore, the perceived distance between characters and the background is exaggerated on the wider focal lengths. Moreover, by being forced to use ultra-wide focal lengths such as 6mm and 10mm the scene was visually warped which distracted from the ‘illusion’ of film. Overall, the shots taken on the full-framed 5D were more aesthetically pleasing with most of the shots using close to the ‘standard’ focal length of 50mm.

For my next step in my investigation I wanted to explore a different application of focal length. When I first proposed this idea to my studio I showed a scene from the film Return of the Prodigal Son which consists of a POV shot from the backseat a vehicle on a relatively long focal length. I found this particularly interesting as shots from inside moving vehicles are normally shot on shorter focal lengths as it minimises the apparent shake of the vehicle.

I decided to compare the perspective and resulting effects of shooting with a short and relatively longer focal length from inside a vehicle. I shot using a focal length of 24mm from the front seat and then 70mm from the backseat providing similar framing. I found that the shots taken at 24mm where noticeably less shakey.  However, there were some instances within the clip where the 70mm provided a smoother image. This was due to me being able to better stabilise the camera from the backseat. In addition, being in the backseat minimised the physical movement of the camera especially when the driver hit a speed bump with one wheel first.

Shooting on the 24mm from the front seat displayed more of the surrounding houses and more of the road immediately in front of the vehicle. While this is the most common techniques and was generally a lot smoother, there was advantages to choosing to use a longer focal length. For instance it enables you to shoot from the backseat and as a result the centre of vehicle, while still minimising the amount of interior visually present. Furthermore, you are able to achieve a narrower field of view in order to focus the audience’s attention on a vehicle, object or character directly in front of the car. Moreover, the longer focal length tends to give a more observational POV and may be suited to a ‘tailing’ scene. Ultimately, the two techniques give different perspectives and while shorter focal lengths are generally used it really depends on the situation and the desired effect.

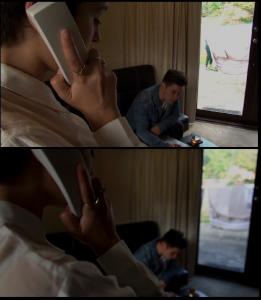
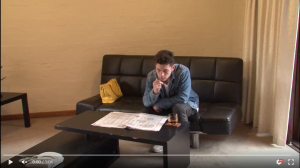
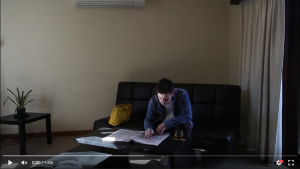
For my final experiment I decided to compare using a zoom lens and a 50mm fixed lens. This was an appropriate follow-up to my original exercise where I discovered that the shots on the 5D which were mostly close to a standard focal length were more aesthetically pleasing. I shot the same scene twice with the same framing on the two different lenses.

Ultimately, this practical investigation has expanded my knowledge of focal length and its application in filmmaking. I will no longer use focal length as a ‘mere zoom’ and will think carefully about which focal length is most suited to what I am shooting. I have become familiar with both the practical advantages/challenges of various focal lengths as their visual aesthetics. A Scene in Cinema has not only educated me on focal length but also coverage/decoupage as a whole. I hope to apply everything I’ve learnt this semester to all of my work in the future.

Over and out,

For the last time

Luke

Fixed-Lens vs. Zoom Lens

Today I did my last exercise where I shoot a scene once on a zoom lens and then get the same shots with a fixed 50mm lens. As always in the filmmaking world things didn’t go to plan. I was prepared to shoot it at home yesterday evening. I had cleaned and set up my lounge room as a film set but my actors decided they couldn’t come at the last-minute. Luckily Sam and Matt offered to help me out this morning. I edited the script so I could shoot a scene with two people and used RMIT as a location instead. Both Sam and Matt had their own last-minute editing/assignments and I didn’t want to hold them up too long. This resulted in me shooting quicker than I originally would have liked.

To recap the shoots purpose was to compare shooting a scene using a Zoom lens at convenient focal lengths and shooting it with a fixed-lens, in this case a 50mm.  Below is the script/shoot list I made in preparation. I was originally planning to shoot indoors however I made the decision to shoot outside so we couldn’t be kicked out of a classroom halfway through. Unfortunately I had some more technically difficulties with the sound. I had hired a shotgun mic to use but for some reason I didn’t work and this resulted in the sound being picked up by the DSLR on-board mic which is terrible. To make this worse the internal mic sounded worse than usual as if it was broken so I had to ditch the audio all together.


Class Room or Outdoor alley

Sam enters a room/outdoor space and meets up with Sam. They move around anxious

Matt

Are we safe?

Sam

Wait and see.

Matt

There’s going to be trouble isn’t there?

                          Sam                          

Don’t worry, I’ve taken steps.


# Shot Type Camera Angle Camera Movement Description
1 MS EL PANS Matt paces the room anxious. Sam knocks.
2 CU EL Matt turns and looks anxiously at the door.
3 TWO SHOT

MCU of Matt

EL Focus pull to Sam Sam enters, looks out the door before closing it.
4 OTS EL Matt anxiously ‘are we safe?’
5 OTS EL Sam ‘wait and see’
6 MCU HA Tilt downwards Matt sits down in concern ‘ trouble’
7 CU LA Sam looks down on Matt says ‘i’ve taken steps’


I found that it took more work to replicate the same shot using the 50mm when I had used a noticeably higher or shorter focal length when using the Zoom Lens. For instance when shooting over the shoulder on the 50mm I didn’t get the same frame. However if had moved Sam closer to Matt then I could have easily of obtained similar framing.

OTS FIXED 50
Fixed, 50mm
OTS ZOOM
Zoom, 100mm

I feel as if the perspective between the two scenes are not that noticeably different, and if they are it’s because I messed up obtaining the same frame. You can pretty much use a standard focal length like a 50mm for any shot if you use it correctly. The primary difference between using the two lenses was my train of thought. When  using the zoom lens I’d just set up the camera at any distance from the subject and start shooting. However when using a fixed lens you have to think more carefully about where to place the camera. You have move around more, manually choosing your desired perspective. I think this is a good thing for an ammeter filmmaker. Zoom lenses can make us lazy and we often don’t even look what focal length we are shooting on. I think using the same focal length throughout a scene gives the shots a certain uniformity that they wouldn’t have otherwise. If I had used dramatically wider focal lengths when using the Zoom the difference of perspective of the two scenes would look noticeably more different.


Handheld

I recently experimented how using different focal lengths can affect shooting in a moving vehicle. I learnt focal length is an important choice when dealing with excessive camera movement. I would like test the effect focal length has on the movement of hand-held shooting. There have been times when I’ve shot hand-held and then gotten back to the edit suites and the footage looked terribly shakey on the big screen. For instance when I shot my film3 documentary on the UPF in Bendigo last year. Maybe if I was to shoot on shorter focal lengths the images would have been a lot steadier. However, due to the crowd I was often unable to get close to the subjects I was shooting so I would have had to sacrifice a tighter frame for a steady image. Amateur filmmaking often seems to be about trade-offs like this.

I plan on shooting a short hand-held scene in where the camera follows two characters as they walk and talk on a relatively long and short focal length. I’m not going to spend a lot of time on this as my primary focus is my fixed-lens exercise which I will be doing on thursday along with this one. There is a chance I may not even do this handheld experiment. I don’t have time as I only have the camera booked for a limited time. However it is good to talk about either way. Obviously the handheld shot taken on the shorter focal length is going to be less shakey although it will interesting to see to what extent. I’m curious what shot I will like better.


The reason I am waiting until thursday to do my last experiment its the only time I can do it without being rushed. This way I could book the camera for the entire day and hopefully shoot something decent.

Over and out,

Luke


Shooting in a Car

Yesterday I experimented with using long and short focal lengths to shoot in a car. I asked my girlfriend to drive the same short route multiple times as I filmed from the backseat with a focal length of 70mm and then from the front seat with a focal length of 24mm.

The idea came from the scene that I showed during my proposal from Return of the Prodigal Son where the cinematographer used a longer focal length and shot from the back of the car. Generally wider focal lengths are used for these shots to minimise the shake of the car and because it’s quite a confined space. However it was in this scene due to the protagonist lying in back of the ambulance. By using a longer focal length from the back of the vehicle they somewhat captured his perspective which is a more observational one.

My girlfriends car wasn’t the perfect vehicle to experiment with this as its very small and there is not much distance between the front and back seat. In addition, she is really messy so it was like being in the trash compactor off star wars. The shots taken at 24mm are noticeably smoother/less shakey than the shots taken at 70mm. However, there are some points within the clip where the 70mm displays less unwanted movement. This is probably because I was able to better stabilise that camera in the backseat because of space. In addition, being in the centre of car resulted in less unwanted movement being picked up by the camera. This is noticeable when the driver hits a speed bump with one wheel first.

In addition, they give us different perspectives. The shot taken in the backseat shows more of the interior of the car. I did try to make the shots similar but it was difficult with the design and size of the car. The front seat shot taken with at 24mm gives us a wider field of view, showing more houses at once and more of road immediately in front of the car. While shooting at a short focal length is convenient it may not always be the best choice. There are advantages to shooting on a longer focal length in a moving vehicle. It all depends of what your shooting and your desired effect. By shooting from the backseat  you are able capture from the centre of vehicle and if you use a longer focal length you can minimise the interior visually present. Furthermore, you might want a narrow field of view to focus on a vehicle, character or object directly in front of car. For instance, if you wanted to shoot a scene where a car is tailing another a longer focal length may be better suited. It tends to give more of an observational point of view and it may be more practical as you wouldn’t have to drive directly behind the car to get good shot of it. In addition, you may just want to avoid capturing people walking along the sidewalk etc.

Ultimately the two techniques used give totally different perspectives and while shorter focal lengths are generally used, it really just depends on the situation and desired effect.


*This experiment was shot with a full framed DSLR at f16.

My Final Excercise

After speaking with Robin today we discussed what I could do for my last exercise. He suggested that I shoot a drama scene twice similar to what I did with my sensor size experiment. Except this time I would shoot on the same camera, most likely the Canon 5D if I can get a hold of one. I will shoot the scene once with a zoom lens using whatever focal lengths are convenient to get each shot. I will then capture the same shot sizes with a fixed lens, probably a standard 50mm. By using a fixed lens I should have to work harder to get the shots I want. For example I may have to move actors into frame etc and not simply zooming out slightly. I propose that the scene shot with the 50mm prime lens will be more aesthetically pleasing. Firstly, I’ll have to take more care with every shot I take. Secondly, because all the shots will be taken with the same focal length they will appear more uniform. One advantage of fixed lens is that they generally can shoot at faster apertures than zoom lens. However this won’t be relevant in this particular exercise as I’ll be shooting on same f-stop on both lenses.


As I am not great at coming up with ideas for things to shoot I plan on simply sourcing a scene from a TV show or movie and adapting it to whatever space/actors/resources I will have. I’ll post further on this once I know exactly what I am going to shoot. If I can get hold of someone with a car and hire a camera tomorrow I am going to shoot my in-car scene.

Until next time,

Luke

Student Collaboration

A big part of this studio is collaboration. Most of us can’t do our investigations alone and need the help of a small crew in the form of our classmates. I am more than happy to help anyone with their investigations. By doing so I am not only helping them out but I am learning things I wouldn’t from my investigation.

Yesterday I helped Sam and Matt with a couple of short exercises. We didn’t have a lot of time as we all had met up with Robin but it was good that I could help them get some practical work done. Matt’s investigation required Sam and I to be sitting at opposite sides of a long desk as he wished to experiment with using the very edges of the frame, prompting the viewer to focus on both edges of the frame and not the centre. Although using the left or right third of the frame is quite common for framing characters, I think his investigation focuses on using the very edges of both sides at once with leaving a negative space in centre. I couldn’t help but think about my focal length investigation in relationship to this. For instance, if he was using a really short focal length with the characters on the edge of the frame it would seem unnatural with them being visually warped. I was also able to help him with achieving a shallower depth of field by telling him to use a longer focal length and a minimise the focal distance.

Sams investigation is about reframing characters within the one take. While I was having my meeting Sam made the most of the time I was absent by carefully planning out the scene so as soon as I arrived we could shoot it quickly. I’m glad he did this as we only had about 10 minutes to do it. It taught me that if you plan out what you are going to shoot well then can greatly minimise the time that actors need to present. It makes me wish I had asked for help with sensor size shoot. Although I did plan it out reasonably well in advance I found it hard to stick to my shot list as I didn’t have help. For instance someone to focus pull, help direct the actors and write shot details for me. This resulted in me taking longer than I should have which lead to multiple problems such as the light dramatically changing and my actors getting impatient. If I had chosen some class mates to act I think they would be more patient due to them understanding the work that I was doing and the constant need for fine adjustments.

I have acted for both Sam and Matt’s investigations a couple of times and they have helped me with some class exercises. It’s worked out well that we all help each other out when we need too. While I think its important to offer my input to others investigations, I think its important not to take over in any way and let them direct the scene as its their investigation.

What’s Next?

Now that I’ve explored the relationship between sensor size, focal length and film perspective. The big question is what is next?

I’d like to shoot a few more exercises before the end of the semester. Earlier today Robin and I discussed what I could to. I’d like to move away from experimenting with sensor size and focus specifically on focal length. Firstly, I would like to replicate the scene I showed in my research proposal from The Return of the Prodigal Son. I want to shoot from the backseat of a moving car with a long focal length and from the front seat with a short focal length. By doing this I compare the varying perspectives and also how the movement of the car affects each focal length.

Secondly I plan on experimenting with handheld and camera movement with short and long focal lengths. Generally handheld movement is captured using a short focal length as it minimises perceived camera shake. However, sometimes you want to use a longer focal length as to not capture everything around you. This exercise will educate me on the pros and cons of shooting handheld on a longer focal lengths vs a short focal length.

Ideally I’d like to do a third exercise to finish of the semester although I haven’t thought of anything yet and I might just have to see how I go for time. Maybe I could capture something that combines everything I’ve learnt so far into the one exercise. I’d also like to further explore how focal length affects the overall decoupage of a scene as that’s what the studio is about.


Post-Production Reflection

While editing I discovered that there a lot of differences between the shots on each camera but most of these are due to my mistakes and not the fact I was using different sized sensor cameras. Regrettably my focus was rough and the shots weren’t identical, with both making it harder to compare.

As I have discussed in earlier posts, to have an equivalent field of view the Z7 had to be on a shorter physical focal length than the 5D. I found that the shots captured on the Z7 had a deeper depth of field. This is because at the same f-stop number of 4.0 as the full framed camera, this corresponded a smaller entrance pupil size and hence a deeper depth of field. The shots below are similar, however the first shot on the smaller sensor Z7 has both characters in focus since the full framed DSLR only has the closer character in focus. I find this shot particularly interesting as the apparent distance between the two characters should appear reduced on the 5D compared to the Z7. However, on the 5D the male character looks further away to our eyes due to him being out of focus. It’s interesting to note the effect that depth of focus has on the perceived perspective.

Screen Shot 2016-05-17 at 2.51.18 pm
Top: Sony Z7 Bottom: Canon 5D


After cutting comparing both camera’s versions of the scene I found that the Canon 5D footage was visually more pleasing. A lot of shots taken on the Z7 appeared warped due to the very wide focal lengths I was forced to shoot on. This becomes distracting and is not what we as an audience are used to viewing visually. By comparing the images below you can see that the window frame is warped in the image taken by Z7. It’s nowhere near aesthetically pleasing or correct as the straight lines of the window framing the female characters face, which we see in the 5D shot. 

WINDOW 5D
Canon 5D – 40mm
WINDOW Z7
Sony Z7 – 4.5mm

Although the shots are framed slightly differently you can still see the dramatic effect that the focal length has had on the background. In the video taken by the 5D the background is completely out of focus directing our attention soley on female character. Furthermore, the perceived distance between the character and the background is reduced compared to shot taken by the Z7. In the Z7 shot the background is partly in focus and you are able to see a lot of it, which is quite distracting. In this shot the distance between the character and objects in the background are exaggerated. You can really notice the difference between the two shots by paying attention to the washing line in the background. On the 5D it seems much closer than it did on the day, because on the Z7 it looks much further away.

Even in the establishing wide shot you can notice the subtle differences that using the shorter focal lengths on the Z7 had on the scene. If you pay attention to the leg of the coffee table in the left corner it has warped. Subtle things like this can distract from the narrative and the ‘illusion’ of film. To achieve similar framing to the 5D I had to shoot at the short focal length of 6mm.

ESTABLISHING SHOT Z7
Sony Z7 – 6mm
ESTABLISHING SHOT 5D
Canon 5D – 40mm

The shots taken on the 5D all look what we think as ‘normal’ as they are shot on focal lengths close to the ‘standard’ focal length of 50mm. A focal length of 50mm is known as a standard focal length due to it being close to what we see with our eyes. That’s why these really short focal lengths are so noticeably different.

Overall the scene captured with the full framed Canon 5D looks better due to being shot on close to standard focal lengths. Furthermore, when I actually focused accurately the shallow depth of field facilitated by the longer focal lengths looked really good for instance the shot of the female character from outside the window. Especially seeing the background isn’t interesting in this scene. I also found the 5D easier to shoot on but this is primarily just because I more accustomed to it than the prosumer Z7 and its many useless buttons.

In terms of the overall decoupage of the scene I think I did a good job but it could be improved. Because I was focused on exploring this idea of sensor size and focal length the decoupage was a second thought and this resulted in a faster paced scene then I think it should be. This was also because I had to shoot it twice in a limited time. Furthermore, there were some nice shots that I captured on the 5D but didn’t have time to shoot them on the Z7 afterwards. So if I was to do an edit of just the 5D footage it would be slightly different.

Over and out,

Luke

Sensor Size Excercise – Production Reflection

On Saturday I shot my sensor size experiment in my lounge room using the Canon 5D and the Sony Z7. I chose an f.stop of 4 as I didn’t a lot of light and it was the lowest the 5D could go and I didn’t want to have to add any gain to the Z7 as the picture would get noisey. I had to adjust the ISO on the Canon to match the Sony Z7 so both camera would have the same exposure. I ended up having some difficulty has the light changed dramatically over the day to intense light and then back to dull light. If I worked quicker I probably could of counteracted this. In hindesight I really should of got someone to assist me. I got a bit overwhelmed, went off plan and it all got a bit messy. I think If I had someone to help me I could of gone through it alot more efficiently. As I was filming at quite a low f-stop I had to do quite a bit of focus pulling. As I had to use shorter focal lengths on the Z7 to get the same framing it resulted in a wider-depth of field than what I acheived with the 5D. This made the focus pulling easier on the 7D. I learnt alot just filming my excercise, I made mistakes but I learnt a lot from them. I reflect further once I have viewed and started to edit the footage. 

Over and out.

Luke