Found Scene (Week 9)

‘Playtime’ directed by Jacques Tati.

The scene begins with an establishing wide shot of the main male character positioned to the right of frame, in a room with monochrome colours, and symmetrical room decor. Going off the Rule of Thirds, character 1 is positioned within an intersection of the grid. The character then sits on a chair in the bottom right hand corner of the frame. Having everything within the set the same, allows the character to stand out through movement, as he is the only one there. However, placing him to the right of frame creates cues for the audience, suggesting that something else is going to happen in the rest of the frame, because Tati wouldn’t leave the shot uneven. This is a still shot, allowing the character movements to guide the audience’s attention around the frame. Two people then enter from a door, filling the space within the frame, and fulfilling the audience’s expectations. However, one walks back through the door, leaving just two characters in the room. Character 2 then sits on another chair that is situated within the other intersection of the Rule of Thirds, balancing the frame. As the new characters were being introduced the camera tracks into the remaining two characters, suggesting to the audience that they are the main focus, and that is where they should be focusing. As one character moves, the other does respectively, creating a symmetrical shot. When the director wants to focus on one character the camera will have them in the foreground with the other in the background. As one of the characters moves, the other is completely still, this is done so that no attention is taken away from the character positioned in the foreground. This shot still goes on the Rule of Thirds, with each character placed within the main focus points. Having the camera angles change, suggests that we are seeing the action from different characters’ perspective. For the duration of the scene, character 1 has stayed in the same position within the frame, however at the end of this scene, the man comes back through the door summoning character 2, and they then leave the room; leaving character 1 alone, just like the beginning of the scene. From here, character 1 gets up off the chair and walks across the room, which destroys the audience’s expectations, however by the positioning within the frame we knew something had to happen within the blank space.

Found Scene (Week 8)

‘Gone Girl’ directed by David Fincher. 2014.

Medium Close up of a policeman starting the scene, suggesting to the audience that the action is taking place at a police station. This shot is the beginning of suggested cues for the audience to follow, in order to gain the greatest impact. The next shot is a medium shot of a female character, possibly a detective, positioned to the right of the frame, looking to the left, suggesting the position of the person she is talking to. Following this the audience sees a male character talking back, the one being interrogated, positioned to the left of frame, and looking to the right. Throughout this conversation that is taking place, it continues in this formation, which is a clear example of external composition. The shots are never the same, they are from different angles however from the same focal length. Having the different camera positions, allows the audience to see the room’s surroundings. There is an over the shoulder shot of the detective, where the camera is looking at the male character,and then one of the male character looking at the detective, giving cues to the audience that the conversation is happening primarily between these two characters. Having these different shots gives the scene some dynamics which intrigues the audience. There are sharp cuts which you would expect in an interview/interrogation scene. There are some medium shots of the detective which gives the audience a quick look at her taking notes, showing another feature of an interview. There is symmetry shown in all of the shots, which is aesthetically appealing even if the audience doesn’t recognise this. The final shots of the scene show all three of the characters sitting around the table, which is important because the audience needs to see all of their expressions and body movements after the intense conversation. The shot then cuts to the male character leaving the room and entering another, and the character follows this movement, while having the other two talking in the foreground of the frame. This suggests the importance of the investigators compared to the male character. He is still in shot, but is shown by himself, with a wall in between them. This individualising is shown throughout the whole scene, by having the male character by himself at one end of the table, while the other two characters are at the other end. This action alone suggests that he is the odd one out. All of the elements put him in the center of the scene, allowing the audience to create expectations that he is on a different level.

Epiphany (Week 9)

Week 9 focused on lighting, and how it affects a specific shot. In groups we experimented with natural and unnatural lighting with reflector boards in a dark room. It was about getting the correct lighting for the scene being created, and the mood we were trying to convey. Paul demonstrated how the offside of the face should be lit, not the side facing the camera, as the back lighting highlights the actor and their facial features; whereas if the front side is lit more, the actor would get lost within the background, and the detail in the face would be non-existent. In this class I understood that lighting plays an important part in creating the atmosphere of a shot. Where the light is directed and the amount of light given, can determine the meaning the audience interprets.

Types of lighting:

-Back Lighting: Comes from behind the character, and makes them stand out more.

-Key and Fill Lighting: Main light source that is within a particular scene, that is usually directed on the character.

-Under-lighting: Light comes from under the character.

-Top-lighting: Light comes from above the character.

-Side-lighting: Light comes from the side of the screen.

With these lighting methods, in class we used reflector boards, one white and one black. My group was beside a window, so we used the natural light whilst using the black reflector board on the other side of the character. This meant that half of the face was lit, and the other was in complete darkness. This showed me how lighting has a significant impact on a scene and how the audience interprets the characters’ story as well.

Method of Working (Part 23)

First Stage Planning:

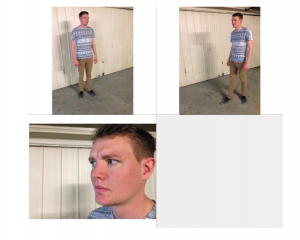
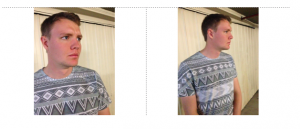
The first stage of my method of working is pre-production. With this I have taken photos as a storyboard, showing me how I could possibly frame the shots. These photos are visual notes that allow me to see what is happening outside of my head and onto the screen. This stage has helped my thought process, and allows me to analyse what I have done, and change it accordingly. I have completed the original shoot to this, and I have received feedback which was documented in my previous posts. This re-shoot is to demonstrate what I have learnt thus far; take into account the feedback; and to experiment with framing through various stages where I will look at the technical elements of the camera that I have just learnt. This shoot is a way to analyse what I have learnt, and to see how I produce it. The shots below are just draft images of the rough estimations I wish to have the actor positioned. I am thinking I wish to start with detail shots. The scene will start with the feet, luring the audience along, making them want, and then cut to a close up of the actor’s face. This is teasing the audience almost in a way the scene should create suspense. After these two shots there will be a full body shot, this way the audience can see the location and the actor, along with all of the details. The next couple of shots are close ups of the actor throughout the conversation with another character, and then cuts out to a wide shot. To end this scene I was considering have a medium shot of the actor’s face, just to finish with the detail of the actor’s facial expression.

Draft 1:

Draft


Draft


Draft

Epiphany (Week 8)

Week 8 focused on the technical aspects of filmmaking, through the elements of the camera. We went through various exercises that were specific to Focal Length, Focus, Exposure, Neutral Density, Gain, and White Balance. All of these were vague to me before this week, so all of this information has had a significant impact on my filmmaking. Getting all of these aspects right is crucial to scene coverage, and can be the thing either makes a scene great or not so great. In groups we went through the features of the camera and figured out how to set up a camera for a shoot. With exposure you had to work with Zebra patterns that came up on the screen; the more zebra patterns there are, the more exposed the shot is. What you want to aim for is to have the tiniest of zebra patterning on the object in focus, in our case, someone’s face. From class discussion I understood what the difference between focal length and focus is on camera. Focal length is how far the front element is from sensor, for example wide or close, and the distance that the subject is just focus or focal point (when they’re in focus). The main focus however was on focus pulling; this involves changing the focus of the shot while the camera is moving and recording. This proved difficult, and time consuming as you have to work out individual points within the shot, as to where to re-focus the object/person. Each point is then marked with tape on the camera, so that when the cameraman hits record, the camera puller knows when and where to adjust the focus in relation to the movement of the shot. This to me, was the highlight of the week, and it is something that makes a great shot a perfect one. All of these techniques are what I will focus on, along with framing in my filmmaking which leads on to further research in my method of working.

Skip to toolbar