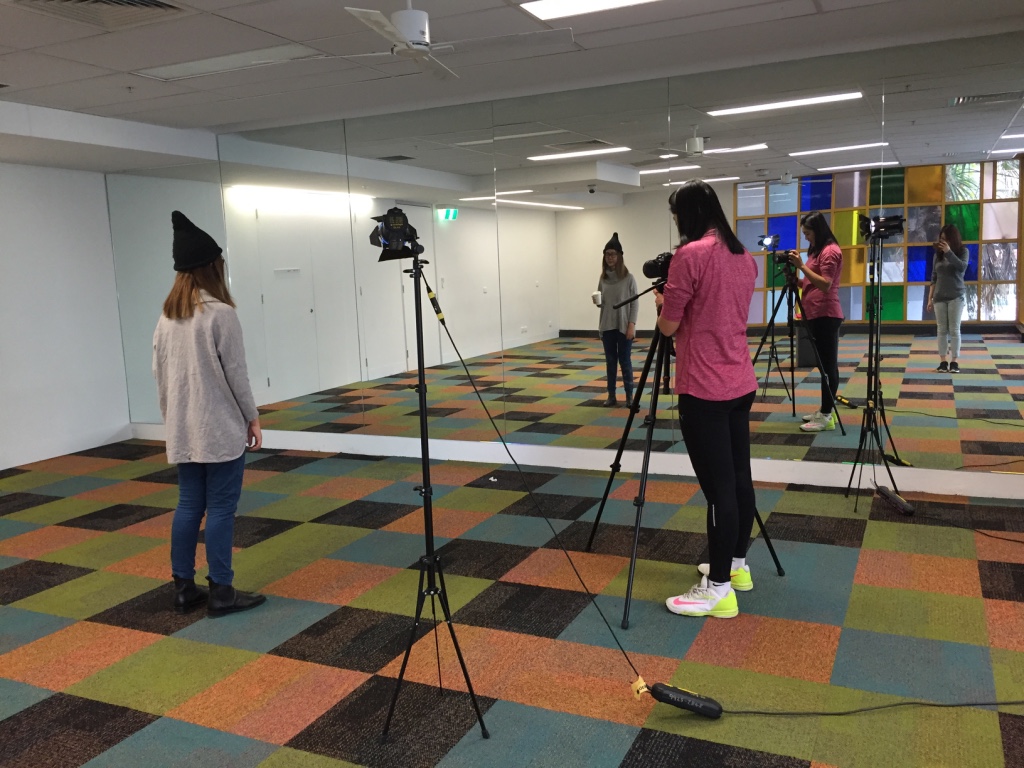
Polly and I met today to film our collaboration shot. Our plan was to find an empty space in RMIT with a mirror so that we could proceed on with our shoot. However what we didn’t realise was that the location needed a permit for us to film. We managed to only shoot half of what we needed, which was enough material for us to work with. Set up was fairly easy as we had a plan and roughly knew what outcome we wanted. I had already planned out how the lights set up should be, thus we could complete the shooting in a short period of time.
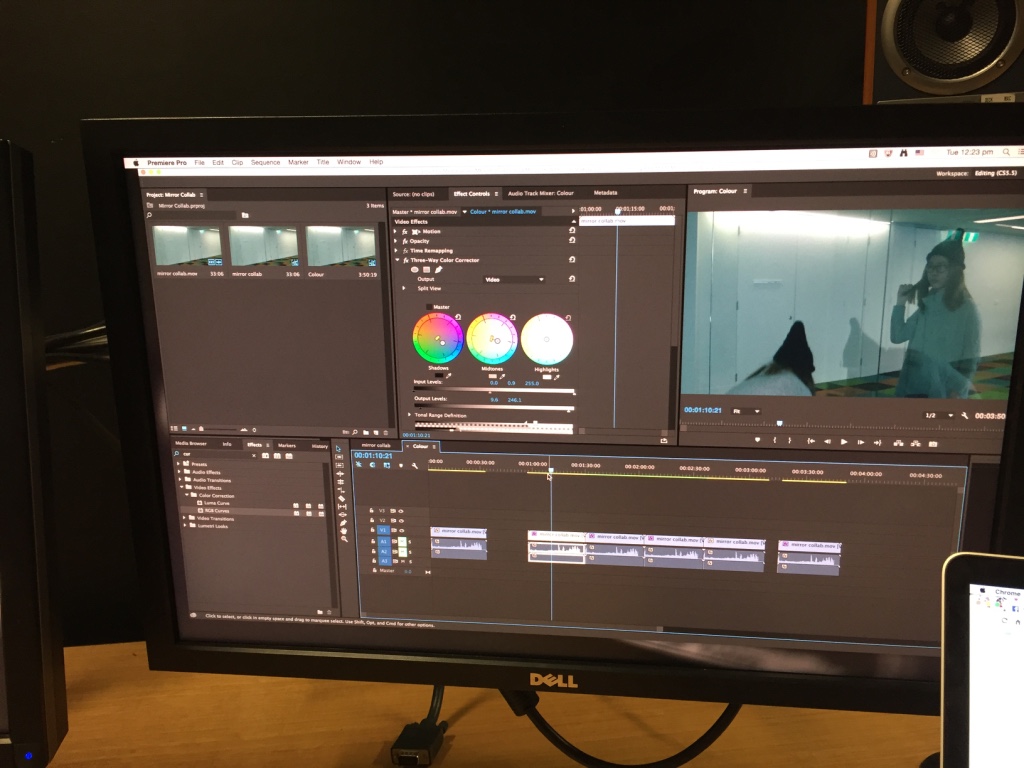
During our editing session, Polly focused more on the masking of the videos as she was more familiar with that. I focused more on colour grading and colour. It was an interesting experience for me as I was really intrigued by her video during the Thursday screening. We shared our views and gave opinions on how we could edit and improve on our work. I liked how we could learn new skills from each other during this collaboration.
For Ways of Making, I honestly expected more collaborations among our classmates outside of class time. As I’ve been reflecting about it the entire semester, I still feel that filmmaking is a collaborative thing itself. While one person might be able to create something amazing, sooner or later they will still have to end up working with a crew, actors or actresses.
Collaboration really worked for me this semester, especially since I was investigating on lighting. Whenever I was stuck, having fellow media friends on set gave me ideas on how I should move on with my investigations. It was definitely more enjoyable bouncing off ideas with Polly when we were doing our collaboration. I definitely also needed help moving huge equipments, or even having assistance on set so that I could solely focus on shooting what I needed.
I think the only main problem I had was trying to arrange to suit everyones timing together. Since we are all students and we have our own individual schedules, it was hard to organise shootings where everyone could attend.
I think ultimately collaboration is necessary for improvement, because your eyes are opened to new things. Seeing things from another perspective or even experimenting with something that you’ve never thought of before.
Came across this youtube video explaining about film looks and mood. It mentions how LIGHT, COLOUR, MUSIC and CAMERA are all important aspects in how your final production will turn out.
While it is always better to make sure that you shoot what you want your film to look like, ensuring that the problems are solved on set. Post-production also allows you to change things up, that’s something that I’ve been experimenting on my videos as well.
If there’s one thing I learnt from this video, it’s that every shot comes with lot’s of planning behind it.
With Paul’s suggestion, Polly and I decided to collaborate between both our productions. I thought it would be useful, because the both of us are currently stuck and running out of ideas for our own projects.
We met on tuesday to brainstorm our ideas. Using Polly’s ideas on telling a story with a mirror, and using my investigations on light, we decided to do a short story film.
This is our vague plan for now. Will ask for feedback during the consults, hopefully we can finalize our idea before our filming session on friday.
3 scenes test from Allison Teo on Vimeo.
In our last class we had a mini screening session to showcase what we’ve done in the past few weeks. It was interesting to see everyone’s work as well as to get suggestions for my own project.
While shooting for my project, I originally wanted to just showcase the three different scenes in my video. However, I was inspired by the colour grading exercise in class to try out the different ways I could manipulate my scene. It turns out that colour grading and lighting are very important in bringing out the emotions in any scene. With the feedback I got from class, I will definitely be experimenting more on colour grading in post-production.
This week we had our tuts in the suits, and Paul introduced colour grading to us. I’ve heard about colour grading before so it wasn’t that new to me, however I didn’t know how to use it in my videos so I wasn’t really sure what it could offer.
Through the exercises in class, I realised that colour could really change the whole look of my scene. This interested me because it was similar to what I was doing with lighting. The change doesn’t need to be very bold or loud, it could be a small tweak to the footage. Yet a subtle colour grade could have a profound impact on the scene.
Came across this video of comparison between the original footage and the colour-graded footage. Watching this masterpiece made me the realise how colour grading can influence the look and feel of a finished piece.
This was actually my third shoot for this semester. However due to some (dumb) technical error, I couldn’t use any of the footages in the previous shoot. I think I learnt the hard way of doing checks prior to any shooting, and not just simply assume that everything will be fine.
During the previous shoot, I attempted to re-create the lighting in different movie scenes. However, I didn’t get any satisfactory shots due to various factors. Eg, scene setting. This made me question my original plan and so I started to explore other areas that I could investigate.
I was reflecting about consults when I started toying with the idea of creating different scenes. I vaguely knew about how hard/soft lighting could change the way we perceive a scene, and I was actually quite interested to try it out.
–
This was my setup for the shoot. Using one LED panel, 2 DEDO lights and the natural light coming from the window, I tried to create three different types of scenes. It was definitely much harder than expected.
My first attempt was to recreate a happy scene. I used the high key setup for this particular scene. The lighting casts very few shadows, and it generally makes everything seem bright and happy.
My second attempt was to recreate an angry/sad scene. I used low key lighting for both scenes. However this was slightly more complicated as I wanted to create two distinct scenes. I tried to change the position/ intensity/ filters/ diffusion of the lights .
I managed to complete the shoot successfully and was really pleased with the end results. I really have to thank my actress for being so willing to do whatever I asked!
Through this second shoot, I realised the need of preparing well before I head out for any filming. Halfway during the shoot, I had to pause halfway to figure out what and how I wanted my scene to look like. Planning ahead could have saved a lot of the time wasted.
We had consultations on Thursdays & I left it slightly clearer about what I was going to do. When I first started this project I had a long list of things I wanted to achieve, however it seems like it would be impossible to achieve them all.
I raised up the issue about how an outdoor shoot will be hard to achieve due to the fact that I did not have any power source available for the dedo lights. Paul mentioned that I could maybe just focus on indoor settings and try the different lightings. It’s definitely do-able, however it does limit the amount of things that I can try.
Also, the fact that having lights in every production makes things complicated when I’m trying to film. Extra lights means extra equipments, and that means that I need extra hands around when I’m doing a filming session. While I’m thankful that there are friends who can help me, it’s certainly not easy trying to co-ordinate the timings and making sure each shoot goes well and it isn’t wasted.
I think I’m reminded once again how film making is still a large collaboration between people.
Well, my first shoot didn’t go well. The weather wasn’t great and my actor had an emergency to attend so she couldn’t make it. I guess I shouldn’t expect that everything will go smoothly..
However it was actually a good chance for me to try out and experiment with the lights. I borrowed the LED panels as well as the dedo lights from the tech office. I found an empty class and decided to pop in. Have to admit I wasn’t very sure of what I wanted at that time, but I still managed to get the chance to experiment which was pretty cool.
Basically my goal for this first shoot was to just try and see how the different lights could affect a particular scene. Since my location was in a classroom, I decided to film a typical student scene. I started out by using no artificial lighting, just the lights that was present in the classroom.
TAKE ONE : No artificial lighting.
TAKE TWO : LED Panel @ 75%
TAKE THREE : LED Panel @ 75% + DEDO Backlight 50%
TAKE Four : LED Panel @ 75% + DEDO Backlight 50% ( 1/4 Blue Filter )
TAKE FIVE : LED Panel @ 75% + DEDO Backlight 50% ( 1/4 Blue Filter ) + DEDO Front (1/2 Filter Blue)
To be honest, the first shot actually looked alright to me. It was definitely something that I would have gone ahead and film before embarking on this investigation. However, while comparing the first and my fifth shot, I realised that there is a huge difference between both.
In the first video, the subject was blended into the background. I felt that in general, the last take showed more details in the shot that was left out from the beginning. The only issue I have is that the shadows created by my front light is pretty obvious in the picture. That was something that I did not take note while filming.
Currently am considering the best way to edit a video to show my findings from this mini experiment.
We had 2 sessions of lighting during the classes the past 2 weeks. To be honest I went in without any expectations. However I really liked how Robin approached the class. He didn’t just tell us what to do, or what is good lighting or not.
Robin showed us a few videos about bad lighting and how decisions that we make can affect the whole feel of the particular scene. The most important thing I took back was that lighting doesn’t particularly need to be a stressful part of filming. Whether it’s using a light prop that can be included in the scene or using natural lighting, as long as it’s used logically, a scene can be beautifully lit.
He left us with a few questions that really helped set some guideline for my own personal project. The first question was “How do I want the scene to be?” and secondly, “What is the decision behind the lighting in the scene?”
The second class of lighting conducted by Paul gave me a slightly clearer idea of lighting. We did a rehearsal with Mia’s idea. Although it was really useful for me to see how a proper rehearsal should look like, I actually had more concerns.
Firstly I realised how important a rehearsal is before we actually film anything. Even before the actors arrive, I should have the basic set-up done and ready to rehearse. However that is definitely not the case for me. I don’t have the manpower and time to prepare in advance, thus I need to be very intentional about my projects and plan them properly so that I do not waste any time.
Secondly a problem that actually cropped up while I was attempting my first shoot was that, I did not have the appropriate power sources for my lights in an outdoor setting. This is a major issue for me as no power source means no lights in the scene. Will need to think about how I can settle this issue. But for now, I will continue on my experiments in an indoor setting.